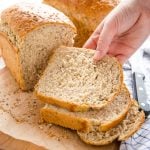
Easy Whole Grain Sandwich Bread
This Easy Whole Grain Sandwich Bread is a rustic-looking sandwich loaf that's perfectly soft and fluffy, & full of fibre & whole grains.
Servings 20 servings
Calories 185kcal
Ingredients
- 1/4 cup lukewarm water
- 1 tablespoon active dry yeast
- 1 tablespoon liquid honey
- 2 cups lukewarm milk
- 2 tablespoons vegetable oil
- 1 egg
- 2 teaspoons salt
- 4 cups whole wheat flour
- 2 cups all purpose flour
- 1 cup multigrain mix (like Red River Cereal or other multigrain cereal mix containing cracked wheat, rye, and flax seeds)
For the egg wash (optional):
- 2 tablespoons water
Instructions
Making the Dough:
- Add the water to a liquid measuring cup and add the yeast and honey. Stir to combine and set aside for a few minutes.
- To the bowl of your stand mixer fitted with the dough hook, or to a large mixing bowl (if you plan to make the bread by hand), add the milk, oil, egg and salt and whisk together until combined.
- Add the yeast mixture to the milk mixture and add the flours and multigrain mix on top (you can soak the multigrain mix for a few minutes in hot water first, if you want, but be sure to drain it well before adding. This step is not necessary).
- Stir everything together well until a dough forms. Turn the dough out onto a floured work surface if making by hand, or knead the dough in your stand mixer with the dough hook attachment until the dough is smooth and elastic.
- If making by hand, flour your hands and begin the kneading process. When kneading bread dough, always start by putting your hand under the edge of the dough farthest away from you and pulling it up and toward you. Then, push it down and away from you, and into the rest of the dough. Keep repeating this motion while turning the dough 90 degrees clockwise every few kneads. It's also important to scoop up the doughy and floury bits on the counter and knead them into the dough as well. The goal is to end up with a smooth and elastic ball of dough.
- Add as little extra flour as possible when kneading, but continue kneading for about 5-10 minutes until the dough is very smooth and elastic. Under-kneading is a very common problem when making bread by hand and it results in loaves that are rock hard on the outside, too dense on the inside, and don't get enough height in the oven. It's almost impossible to over-knead bread when you're kneading by hand because it's such hard work. So if you think you've kneaded long enough, keep kneading for at least another few minutes.
- Return the dough to its bowl, cover it with plastic wrap and let it rest in a warm, draft-free place until it doubles in size (about 1 hour and 20 minutes should do).
- Once the dough has risen, grease 2 loaf pans with butter and set them aside.
- Flour your hands again and punch the dough down until it deflates completely. Divide the dough evenly into 2 pieces and let them rest on the counter for about 5-10 minutes before shaping into loaves. This will make the shaping process easier as it allows the gluten to relax and makes the dough softer and easier to work with.
Shaping the Loaves:
- After letting it rest, shape the dough into a rectangle (with the short end about the same length as the long side of your loaf pan).
- Fold one short end into the middle and press with your fingers to seal.
- Fold the other short end into middle and press with your fingers to seal.
- Pinch the sides and pull them in slightly.
- Flip the whole thing over and tuck the ends under again. Place the loaf into the greased loaf pan.
Second Rise and Baking:
- Preheat your oven to 400 degrees Fahrenheit. Place the shaped loaves in their pans under a clean tea towel (I have a few I reserve just for this purpose) and let them rise for 25 minutes.
- Check them after 15 minutes, to make sure they haven't over-risen. If they're ok, wait at least another 10 minutes before checking again. They should be larger but not so large that they're overflowing the pans.
- This second rise is very important. If the loaves under-proof they'll be dense and chewy. If they over-proof, they'll have large holes (especially right under the crust) and they'll fall apart easily.
- Bake the loaves at 400 degrees for about 20-25 minutes. Because every oven is different, watch the loaves after 18 minutes to ensure they're not becoming too brown on top.
- Let the loaves cool in their pans for about 5 minutes before turning them out onto a cooling rack to cool completely.
- As always, the loaves will continue to bake on the inside even after you've removed them from the heat of the oven, so it's important to resist the urge to cut into them until they have cooled almost completely.
Video
Notes
Each loaf yields about 10 good slices of sandwich bread, and since this recipe makes 2 loaves it yields about 20 slices in total.
This bread freezes well in an airtight bag or container for up to 2 months. Store it at room temperature in an airtight bag or container for up to 3 days.
Nutrition
Serving: 1slice | Calories: 185kcal | Carbohydrates: 34g | Protein: 6g | Fat: 3g | Saturated Fat: 2g | Trans Fat: 1g | Cholesterol: 11mg | Sodium: 247mg | Potassium: 166mg | Fiber: 4g | Sugar: 2g | Vitamin A: 54IU | Vitamin C: 1mg | Calcium: 39mg | Iron: 2mg