The Perfect Pavlova
This Perfect Pavlova is a delicious gluten-free dessert that's easy to make!
Servings 8 servings
Calories 108kcal
Ingredients
- 4 eggs whites at room temperature
- 1 cup sugar
- 1 tbsp corn starch
- a few drops of vanilla
- whipped cream or whipped topping of your choice
- a variety of berries washed and dried, or other fruit of your choice - Traditional Australian Pavlova is usually served with fruits like mango, bananas, and passion fruit
- Parchment Paper for baking
Instructions
- Preheat the oven to 275 degrees Fahrenheit (135 C).
- You'll need to start with a stand mixer fitted with a whisk attachment and a clean, dry bowl.
- Pro Tip #1: The trick to the perfect pavlova is making sure you whip enough air into the egg whites, so if you start with a bowl that's even a little bit wet or contains even a trace of oil, the egg whites won't aerate properly and the pavlova will sink in the middle. Avoid using a plastic bowl since plastic can absorb oil. Glass bowls are best, and metal bowls work well too.
- Add the 4 egg whites to the bowl. When you're separating your egg whites from the yolks, make sure the yolks are intact. If any yolk gets into the whites they won't aerate properly and you'll have a hard time achieving the correct consistency for the meringue mixture . When you notice the egg whites have become quite foamy, begin to add the sugar very gradually, 1/4 cup at a time.
- Once you've added all the sugar let the mixture continue to whip on high speed until stiff peaks form and all the sugar has dissolved.
- Pro Tip #2: You will know you've allowed the mixture to whip long enough when you can see a stiff peak when you pull the whisk attachment out of the mixture and turn it upside down, and when you're able to rub a small amount of the mixture between your fingers and it feels smooth (no grains of sugar present). Don't stick your finger directly into the mixture! Your skin has oils on it that can affect the texture of the meringue so it's best to grab a clean, dry spoon and grab a bit of the mixture that way so you can rub it between your fingers.
- Next, add the cornstarch and a few drops of vanilla and whip only until it's combined, scraping down the sides of the bowl once.
- Pro Tip #3: Trace a circle (about 8 inches in diameteon a piece of parchment paper with a Sharpie. Turn over the piece of parchment paper and place it on a rimless baking sheet (a pizza pan also works welwith the marked side down. Scrape the mixture out of the bowl and onto the parchment paper, using the circle you traced as a guide for the size and shape of the pavlova. It's important to trace the shape on the underside of the parchment, and not the side that actually touches the pavlova as the marker will transfer to the pavlova during baking and discolour it.
- Pro Tip #4: Using a pallet knife or hard spatula, pull up the sides of the pavlova in a swirling motion to create a very shallow "crater" in the middle. This will help it keep its shape during baking. It may be tempting to shape the pavlova with a larger diameter than 8 inches, but try to keep it small and tall. This will create a more impressive appearance and ensure there's a thick layer of that delicious marshmallowy interior!
- Bake the pavlova in a 275 degree oven for about 80-90 minutes. A good thing to remember is that your pavlova will not over-bake unless it starts to brown.
- Pro Tip #5: The real danger is in under-baking as this will cause the pavlova to remain raw in the middle and collapse as soon as it begins to cool. Trust me, it's a huge disappointment when you have to start over because you under-baked it!
- Pro Tip #6: After the pavlova has finished baking turn the oven off and crack it open with a wooden spoon, allowing the pavlova to cool inside the oven. This will help it maintain its shape and allow the outer "shell" that develops to protect the marshmallowy interior.
- It is completely normal for the pavlova to crack during the baking or cooling process; this lends to its rustic appearance. Don't stress about cracks (but do cool it in the oven with the door cracked open to help prevent cracking!), but if cracks form and the pavlova collapses at all during the cooling stage, this means it is under-baked (insert sad face emoticon here).
- Once the pavlova has cooled completely (I usually leave the it in the oven like this for several hours, but you can also leave it overnight), carefully remove it from the oven and slide it off the parchment paper and onto a serving plate.
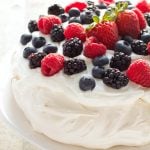
- Serve with whipped cream and fresh berries!
Notes
This Pavlova is best served the day it's made or one day after it's made. Just make sure to assemble it with the whipped cream and fruit right before serving.
Nutrition
Serving: 1serving | Calories: 108kcal | Carbohydrates: 26g | Protein: 2g | Fat: 1g | Sodium: 25mg | Potassium: 24mg | Sugar: 25g