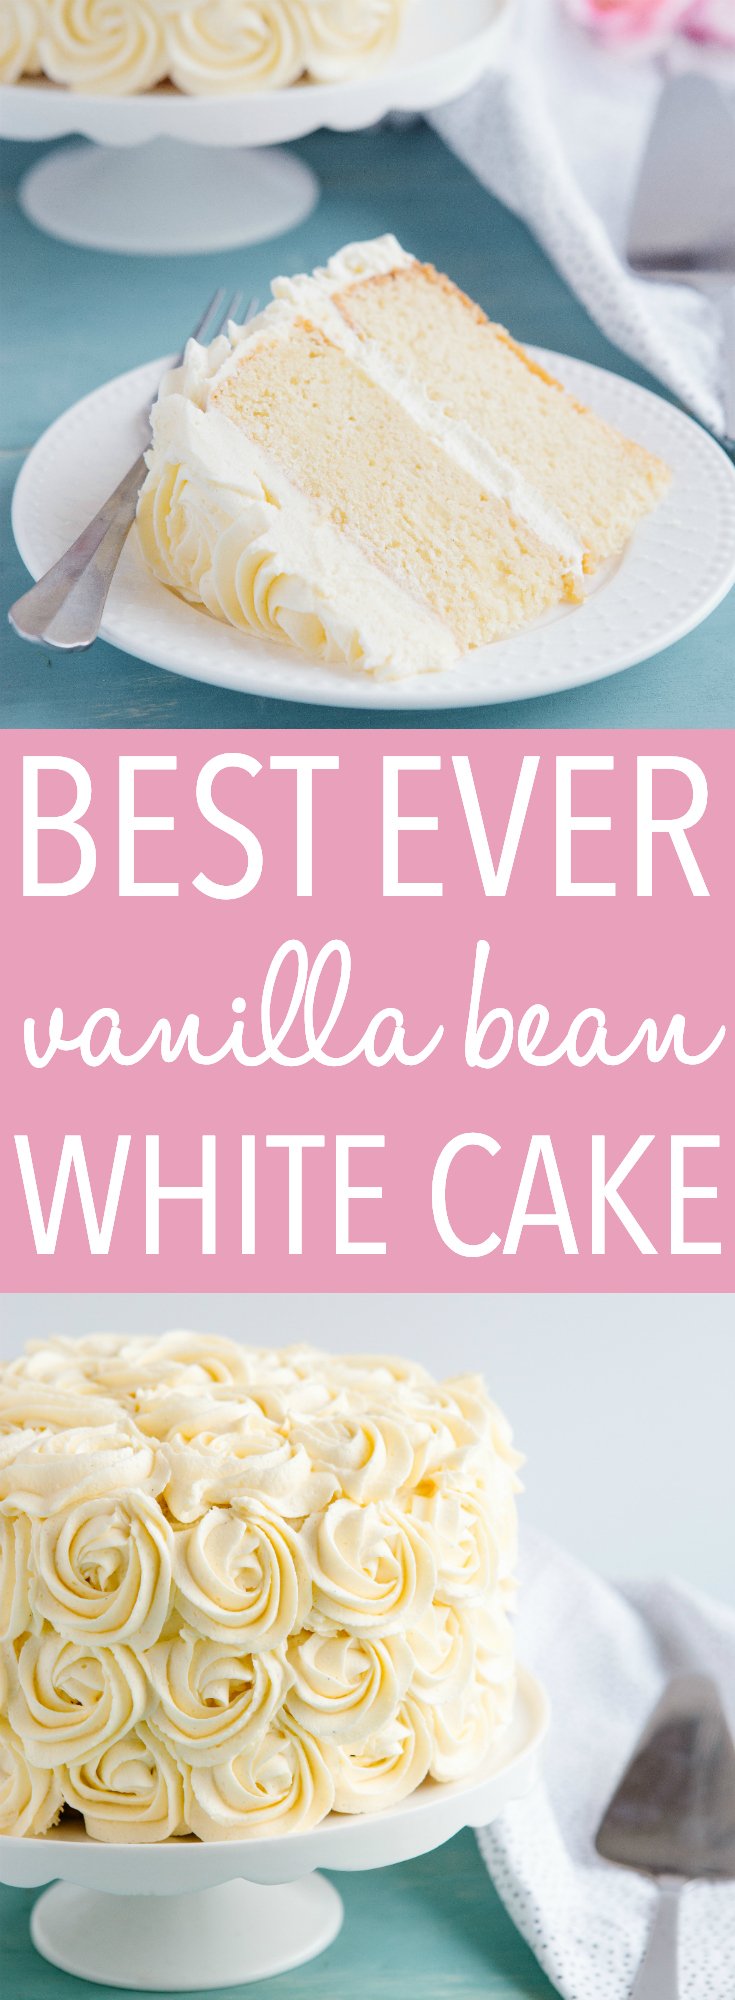
This homemade Vanilla Cake recipe is the perfect tender cake with creamy, fluffy frosting. An easy vanilla cake recipe for beginners – with PRO baking tips!

Estimated reading time: 20 minutes
When it comes to cakes, making your own layer cakes at home can be a hugely intimidating task – there are so many ways homemade cake recipes can flop and when you’re making a cake for a special event or a birthday. You need a tried and true cake recipe that won’t let you down.
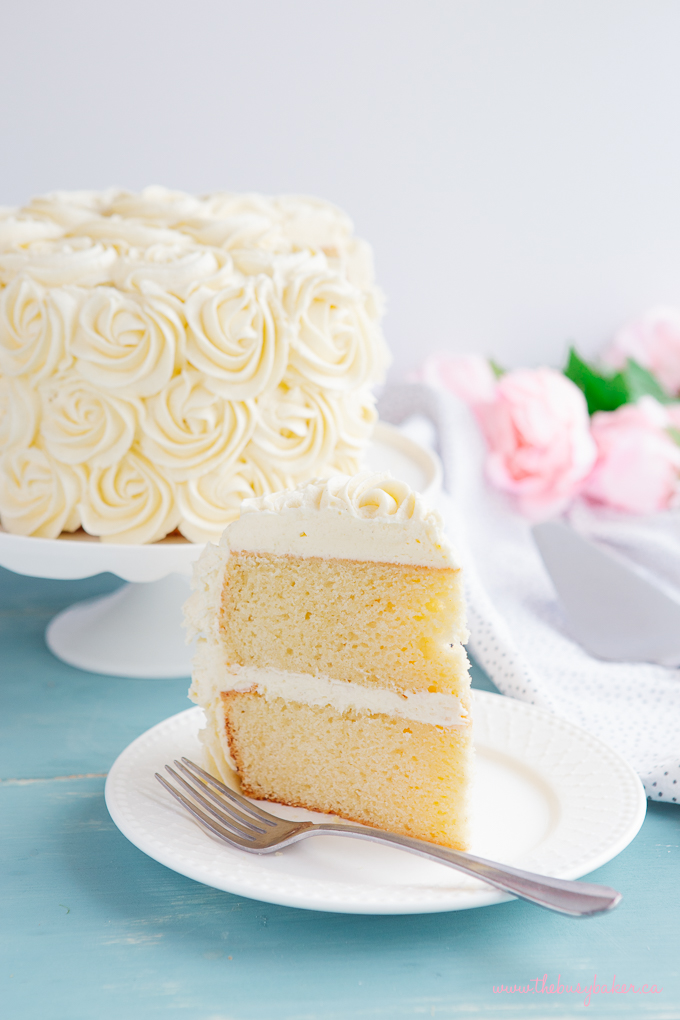
This Vanilla Cake recipe is our go-to cake recipe for anytime we need to make a layer cake. Its absolutely fabulous, it’s totally delicious, it has the perfect tender texture, and it’s super easy to frost and decorate. If you need a go-to cake recipe, THIS is it!
Here are just a few reasons we LOVE this easy vanilla cake recipe!
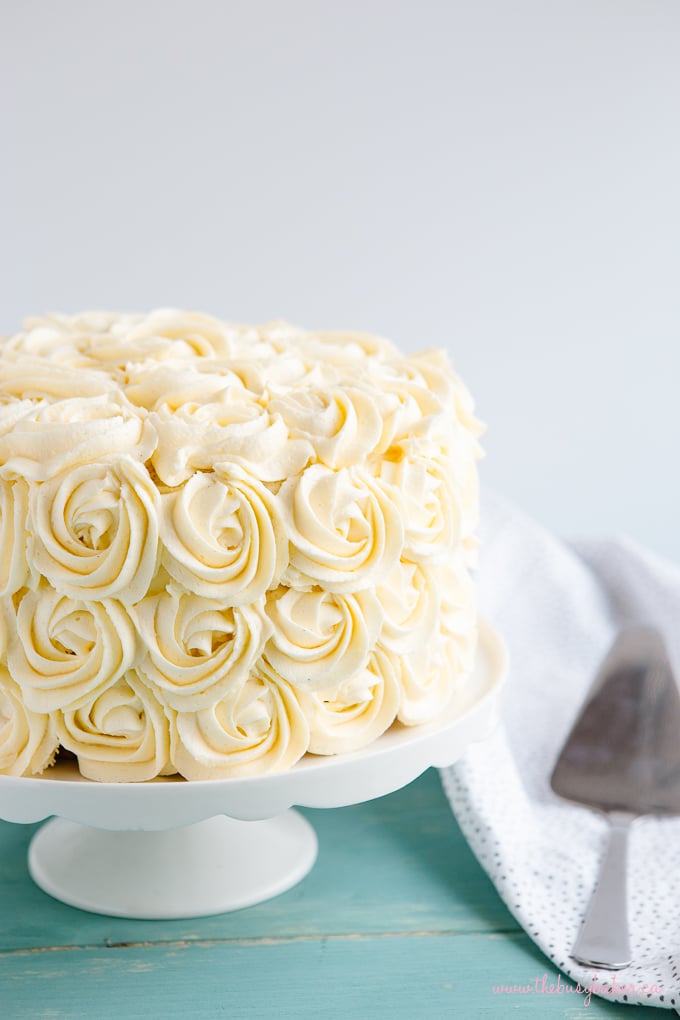
- It’s GORGEOUS. Is there anything more beautiful than a white cake with white frosting? It’s got such a classic look and it’s perfect for entertaining.
- It’s SIMPLE to make. It’s a truly simple vanilla cake recipe with a easy method that turns out beautifully every time.
- It’s easy to MAKE AHEAD. We like to make this cake a few days or even weeks ahead of time. We wrap it well in plastic wrap and refrigerate or freeze the layers until we’re ready to make the frosting and serve it.
- It’s perfect for CELEBRATIONS. Looking for a classic birthday cake that’s the perfect canvas for personalization or decoration? This is it!
- It has amazing FLAVOUR. The vanilla flavour in this cake is intense, making it super delicious!
- It’s a great recipe for BEGINNERS. If you’ve never made a layer cake before, this is the one to start with. With ALL the pro tips, tricks, and baking science we share, you’re sure to succeed!
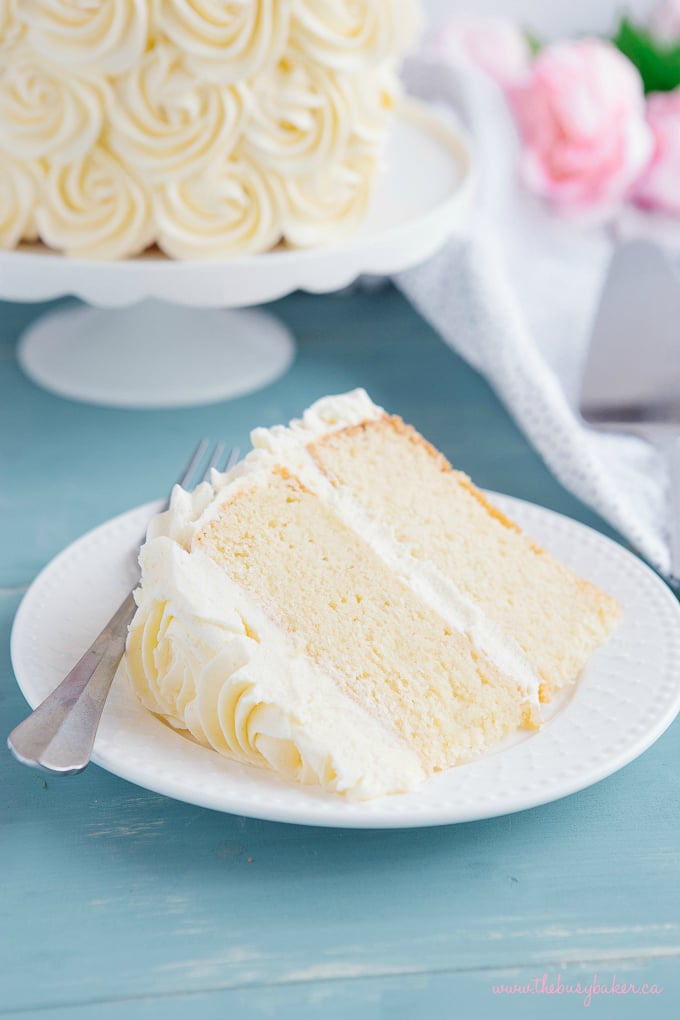
A vanilla cake is a classic dessert that’s known and loved thanks to its simple elegance and equally delicious flavour. Vanilla cakes have a light, fluffy texture and a rich vanilla aroma that comes from using real vanilla beans. It’s the kind of cake that goes beyond any trend and is perfect for all occasions – everything from an afternoon tea to bridal shower to a birthday party and even a grand wedding celebration.
Even though white cake, vanilla cake, and yellow cake may look the same at first glance, each one is a little different from the other. Here’s how:
- White Cake: White cake is known for its absolute pristine and pure white colour, which is usually achieved by using only the egg whites in the cake batter rather than whole eggs. The flavour of a white cake is subtle, it has a light texture and crumb, and because of its pure white flavour, it’s often a great choice for wedding cakes.
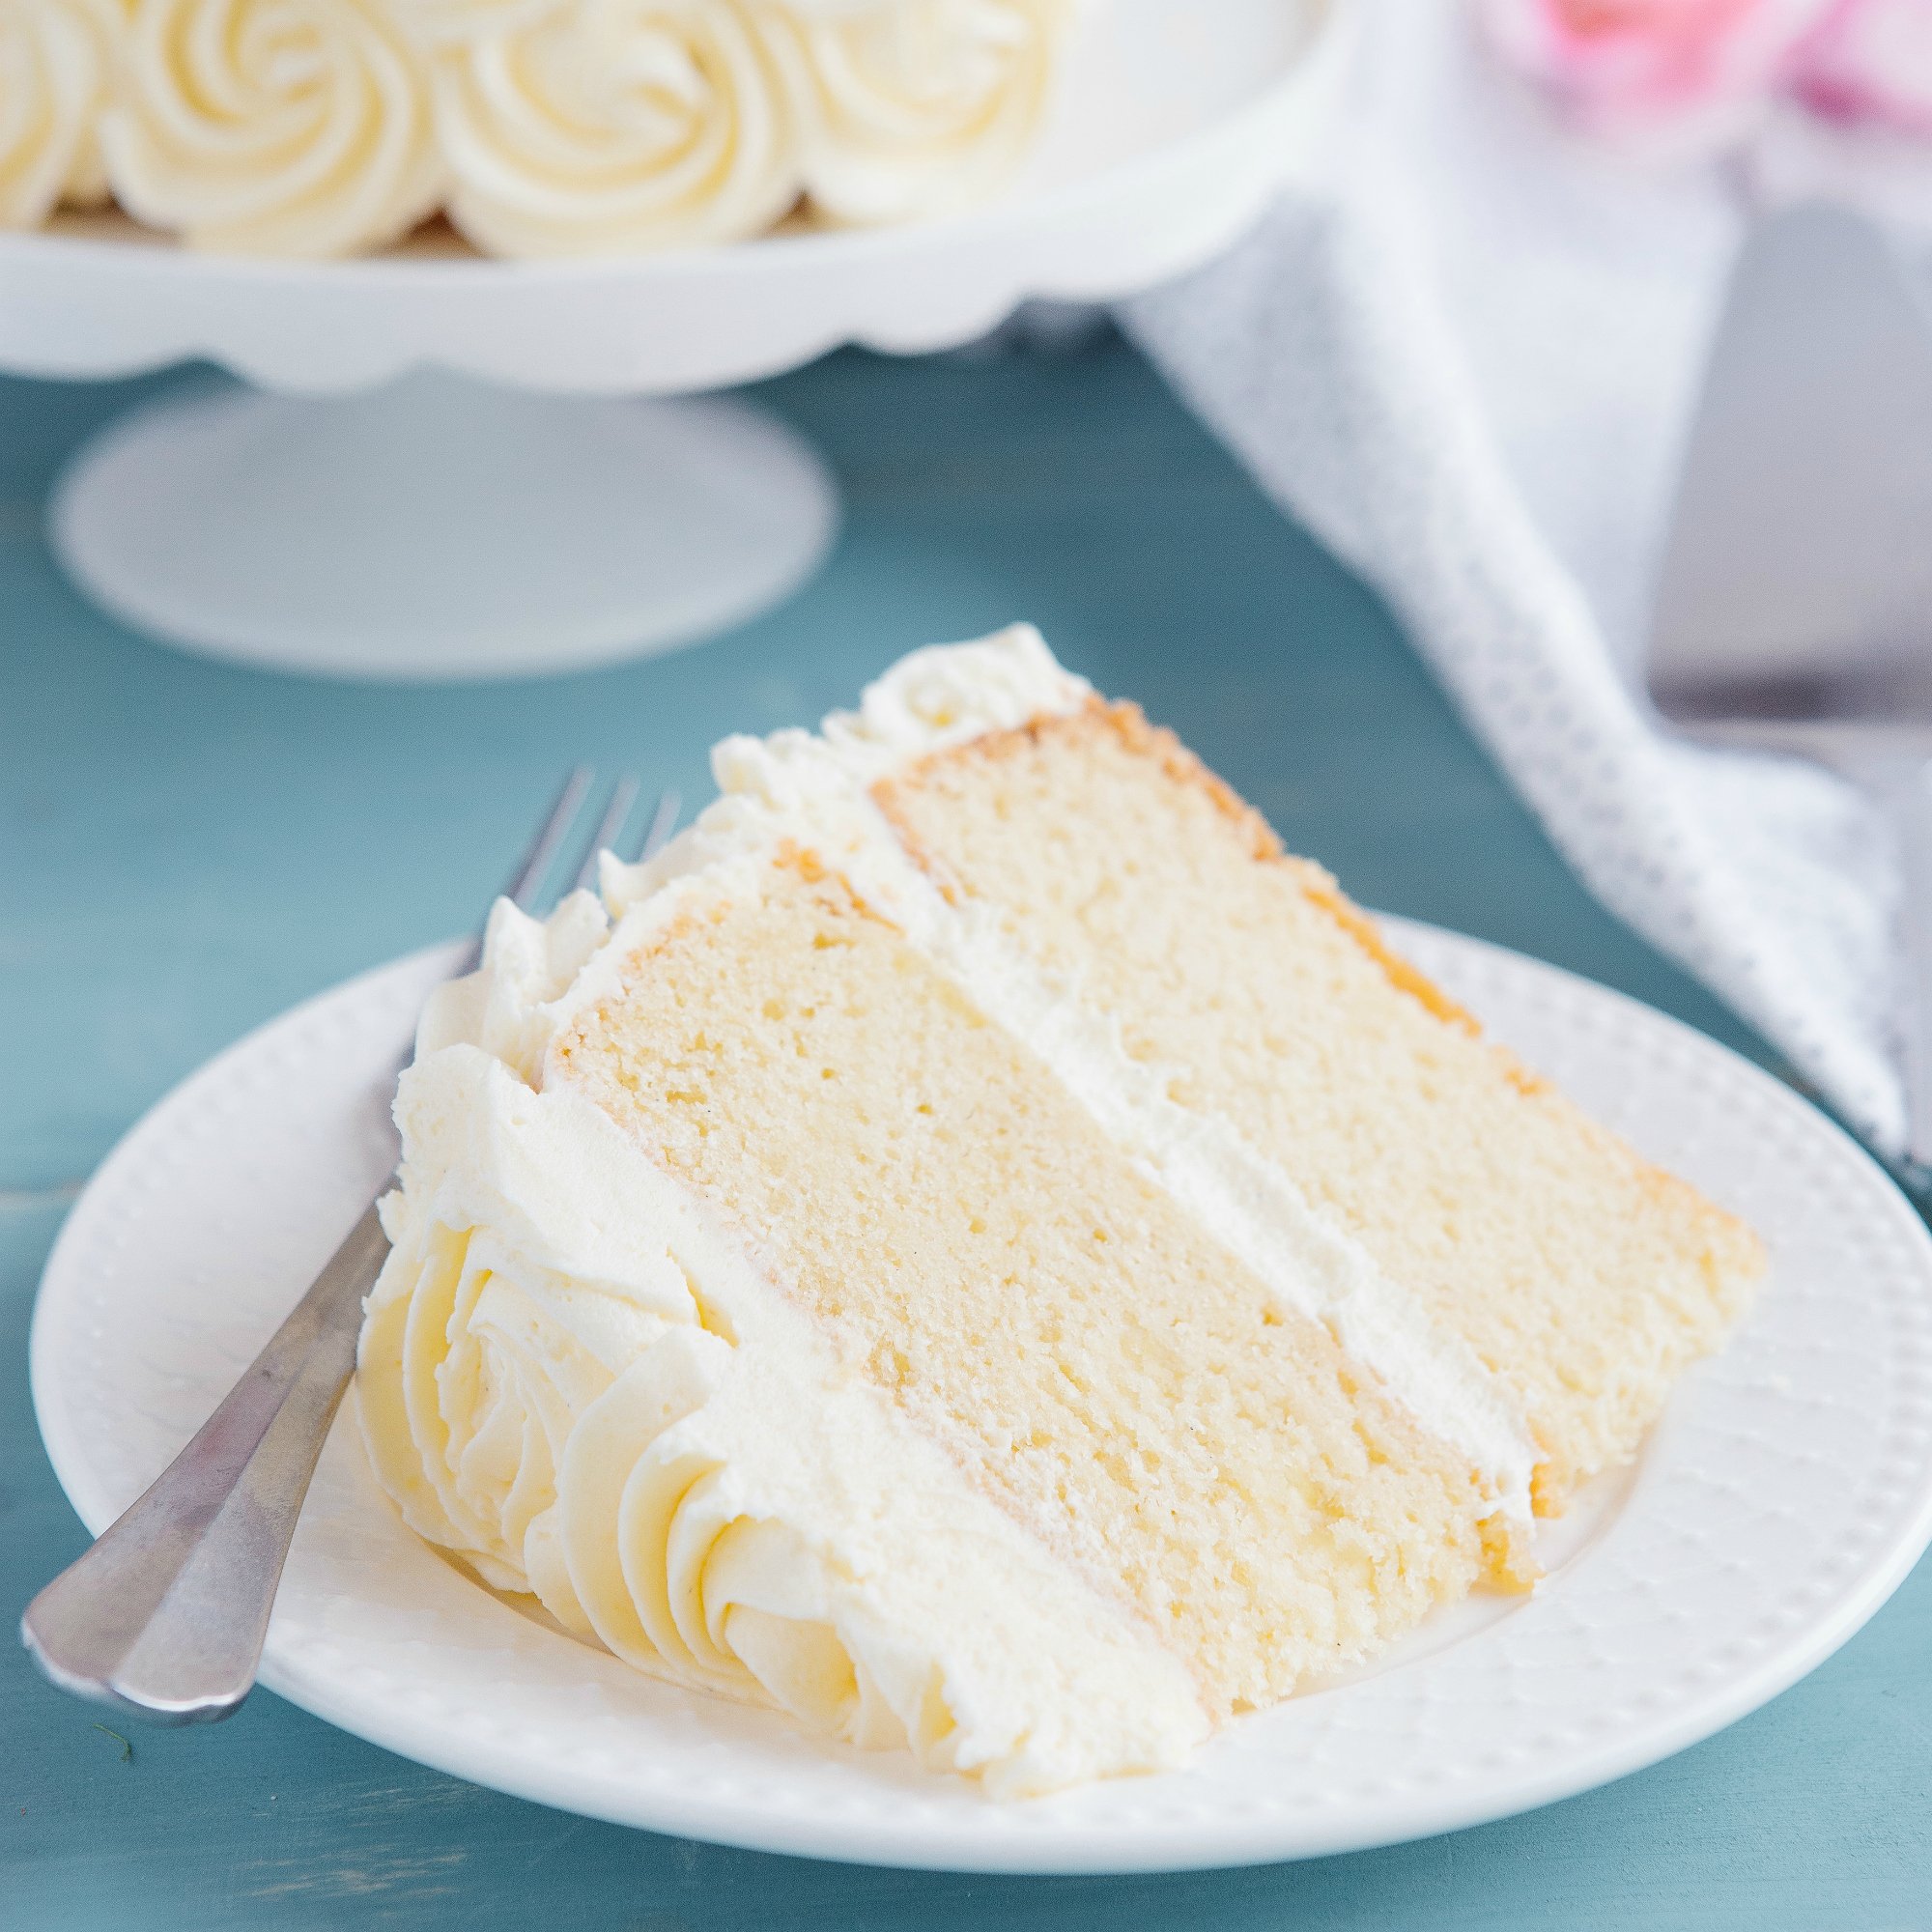
- Vanilla Cake: A vanilla cake recipe calls for whole eggs and sometimes extra egg yolks, which gives it a slightly richer taste than white cake and a very light golden yellow colour. Vanilla cake has a rich aromatic flavour thanks to the addition of lots of vanilla – usually vanilla beans or vanilla bean paste, not just vanilla extract.
- Yellow Cake: Yellow cake is much richer and moister than both white and vanilla cakes because yellow cake recipes call for an even higher proportion of eggs and egg yolks. This gives a denser texture and a deeper yellow colour. Yellow cakes are buttery and rich with a mild vanilla flavour.
Want to become a PRO cake baker? Here’s a list of ALL our best pro tips for taking your baking game to the max with this best vanilla cake recipe!
- Start with room-temperature ingredients. Make sure your milk and eggs are at room temperature. This will create a smooth cake batter and help the ingredients combine properly.
- Measure the flour correctly. The best way to measure flour is in grams, but if you’re using cup measurements be sure to fluff the flour in its bag or container before scooping VERY gently (don’t pack the flour into the measuring cup at all), and then level it off with the back of a knife or other flat object.
- Avoid over-mixing, especially after adding the flour. Over-mixing can create a dry, tough cake because it reduces the number of air bubbles present in the batter which give the cake its lift as it bakes.
- Don’t mix on high speed. This can create something called tunnelling where long, thin air bubbles appear in the baked cake. This is caused by vigorous mixing that strengthens the gluten strands in the cake batter too much.
- Prepare the pans properly. Always grease your cake pans generously with butter and dust the inside with cocoa powder on all sides (use flour if you’re making a white cake and cocoa powder for a chocolate one). This will prevent the cake from sticking to the pan. We suggest using spring-form pans for baking cakes for even easier removal.
- Bake immediately after mixing. Don’t let an unbaked cake sit out on the counter. Always preheat your oven first and bake the cake immediately after adding the batter to the pans. This will help the cake rise properly in the oven as the leavening agent in the cake batter is activated as soon as the wet and dry ingredients are combined.
- Place the pans in the centre of the oven. Don’t place the pans too close together as this can cause them to brown too much on one side. Add the pans to the centre of the oven so they bake evenly.
- Don’t open the oven as they bake. Avoid opening the oven during baking unless it’s absolutely necessary to rotate the cakes while baking (if your oven is small or has a hot spot). Opening the oven door at the end of the baking time is ok, especially because testing the cake with a toothpick is necessary to prevent over-baking.
- Don’t over bake. Over-baked cakes are dry and crumbly. Be sure to remove them from the oven as soon as a toothpick inserted into the top of the cake comes out clean.
- Don’t under bake. Under-baked cakes are partly baked but gummy on top and in the centre. Test the cake with a toothpick to be sure the cake is baked completely.
- Don’t let them cool completely in the pan. Cool the cakes in the pan only for the first 10-20 minutes of cooling, then turn them out onto a cooling rack to cool completely. Cooling the cakes in the pan will trap moisture in and make them soggy.
- Frost only after completely cooled. Don’t try to frost a cake that’s still warm, especially if you’re using a butter-based frosting as the butter will melt and you’ll be left with a mess. Wait for the cakes to cool completely, then frost.
- Level the cakes before frosting, if necessary. Use a large serrated knife (like a bread knife) to cut any domed top off of the cakes before assembling and frosting.
- Chill the cake during assembly. Add whatever filling you’re using between the layers, then chill for 20-30 minutes in the fridge. This will help the filling firm up so the cake keeps its shape as you add the frosting around the outside of the cake.
- Chill the cake before slicing. Place the cake in the fridge once you’ve finished frosting it so the frosting can firm up. This will make the cake easier to slice and create clean, uniform slices.
Frosting a layer cake is not just about making it look pretty! Proper frosting technique helps seal in moisture and helps the cake keep its shape. Here’s our detailed guide to help you frost your homemade cakes perfectly!
- Prepare Your Tools: Before you start, make sure you have helpful tools: a turntable or lazy susan (extra helpful for spinning the cake as you frost it), an offset spatula, a bench scraper, and a piping bag and tip are the tools we always use for frosting layer cakes. Have your frosting ready and make sure it’s at a spreadable consistency. If it’s too stiff, you can soften it slightly in a mixer on low speed using the paddle attachment (using the paddle attachment instead of the whisk attachment prevents you from adding too much air to the frosting, as this can cause air bubbles, making it hard to work with). Make sure your workspace is clean and that you have enough room to maneuver around the cake.
- Level the Cake: After your cakes have completely cooled, you’ll likely notice they have domed on top just a little bit. To create a flat, stable surface for frosting, you need to level the cakes by gently sawing off the domed top using a serrated knife. Aim to keep the knife as level as you can.
- Stacking the Cake Layers: Begin by placing your first layer on a cake board (bottom side down) slightly larger than your cake. Scoop about 1/2 to 3/4 cup of frosting onto the centre of the layer, then spread it evenly with your offset spatula all the way to the edges. It’s crucial to get this layer even, as it sets the foundation for the rest of your cake. Add the second layer on top, but turn it upside down so the flat bottom is actually the top of the cake. This will give your layer cake a professional look.
- Apply a Crumb Coat: The crumb coat is a thin layer of frosting that helps to catch any loose crumbs so that they don’t appear on the outer layer of your cake once it’s frosted. After stacking your layers with frosting between them, apply a thin coat of frosting all over the cake. Use your offset spatula to spread it, and then smooth it out with the bench scraper. Don’t worry if it looks messy and is full of crumbs… that’s why it’s called the crumb coat. Refrigerate the cake for about 30 minutes to set this crumb coat, which will make applying the final coat of frosting SO much easier.
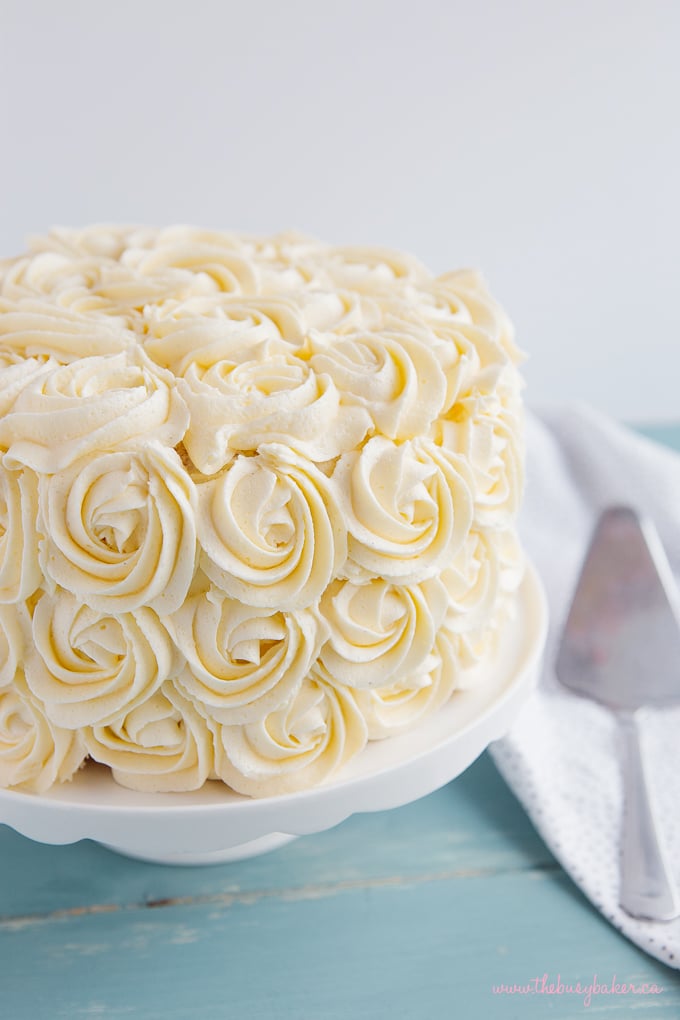
- Frosting the Cake: Once the crumb coat is set in the fridge, apply the final coat of frosting by adding a generous amount of frosting on top of the cake, and spreading it outwards and down the sides of the cake evenly with your offset spatula. Keep the layer of frosting uniform, as much as you can, and create rustic swirls (or follow our rosette tutorial).
- Refrigerate Before Slicing: As tempting as it might be to slice it right away, 30 minutes in the fridge will help the frosting firm up just enough to slice the cake cleanly. This will give your cake slices that professional bakery look.
Creating rosettes on a cake is a beautiful way to take it to the next level. Here’s how to perfect this rosette technique when you make this best vanilla cake recipe – the EASY way!
- Choose a large star tip: For rosettes, this tip is ideal. Make sure to prepare your piping bag by inserting the tip and filling the bag with frosting, but don’t over-fill it – we recommend 2/3 full because this allows for better control.
- Piping the Rosettes: To pipe a rosette, start by positioning the tip perpendicular to the cake’s surface at the point where you want the centre of your rosette to be (we suggest starting at the bottom of the cake with your first rosettes). Apply steady pressure to the piping bag and pipe a tight spiral. Begin in the centre of the rosette, then move outwards in a circular motion working either clock-wise or counter-clockwise, aiming to complete the circle at the bottom of the rosette (so, pipe your circle down, then up and around and down again). Release the pressure as you complete the circle at the bottom of the rosette and pull the tip away gently to avoid dragging the peak of the frosting.
- Practice Your Rosette Technique First: If you’re new to piping rosettes, it might be useful to practice on parchment paper or even a plate before starting on the cake. This will help you get a feel for the pressure and motion required to make a rosette.
- Placement on the Cake: Plan to make a rosette border at the bottom of the cake, all the way around. Move up to the next row, but stagger the rosettes on the next row, placing the centre of the first one directly above but in the middle of two in the bottom row. This will help fill in the gaps so once the cake is done you won’t see any of the crumb coat. Be sure to space them evenly and keep them all similar in size. We always pipe rosettes on the side of the cake first and then do the top last.
- Fix your Mistakes: If you pipe a rosette and it doesn’t look quite right, just carefully scrape it off and add the frosting back into the bowl to use later. Try again and re-pipe a new rosette in the same place and no one will ever know!

Maintaining moisture in cakes is very important and there are a few secrets professional bakers use to make sure their cakes are perfectly moist, every single time:
- They Use the Right Ingredients: High quality butter, the addition of vegetable oil, and incorporating buttermilk or sour cream adds richness and moisture to cakes.
- They Follow the Correct Baking Process: Professional bakers measure correctly and accurately, the use the correct oven temperature, and avoid over-baking – all things that affect the moisture level of a cake.
- They Use Syrups: Professional bakeries often brush their cakes with a simple syrup before frosting and decorating to add sweetness and other flavours, as well as moisture.
- They Cool, Handle and Store the Cakes Properly: Letting the cake cool in the pan for a short time prevents it from releasing too much steam. Wrapping the cake layers in plastic wrap if you’re storing them also helps lock in moisture, and storing the cake in an airtight container even after it’s frosted helps it stay moist.
- They Frost the Cakes Properly: Frosting the cake with a crumb coat first locks in moisture because the crumb coat acts as a moisture barrier.

Here are some common problems you might encounter while baking layer cakes and how to prevent them:
- An uneven or sunken cake:
- Make sure to measure ingredients accurately, especially the leavening agents like baking powder or baking soda.
- Do not over-mix the batter as this can result in excess air being incorporated into the batter, leading to uneven baking and sinking in the centre of the cakes.
- Ensure the oven is preheated to the correct temperature before placing the cake inside.
- Avoid opening the oven door during baking as this can cause major changes in oven temperature and result in an uneven rise.
- A dry or dense cake:
- Measure the flour properly by spooning it into the measuring cup and levelling it off, rather than scooping it directly from the bag (using the fluff and scoop method also works well).
- Do not over-mix the batter as this can over-develop gluten in the batter and lead to a tougher texture. Mix until the ingredients are just combined and the flour disappears.
- Check the baking time and temperature. Over-baking can cause the cake to dry out. Use a toothpick to check for doneness.
- A cracked cake:
- An oven temperature that’s too high can cause the cake to rise too quickly and crack on the surface. Double-check that your oven temperature is correct by using an oven thermometer.
- Avoid opening the oven door during the first half of baking. This can cause sudden temperature changes that contribute to cracking on the top of the cake.
- Cakes that stick to the pan:
- Properly grease and flour the cake pans (dust with cocoa powder instead of flour for a chocolate cake). You can also use parchment paper to line the bottoms of the pans to prevent sticking.
- Allow the cake to cool in the pan for 10, 15 or even 20 minutes before inverting it onto a wire rack. Cooling the layers in the pan for several minutes helps the cake release more easily.
- Sunken cake layers:
- Check the freshness of your baking powder or baking soda. They lose potency over time and can cause cakes to sink. Replace them if necessary.
- Ensure the oven temperature is accurate. Use an oven thermometer to check the temperature.
- Avoid over-mixing the batter, as this can deflate the air incorporated during the creaming process. Mix until just combined.
- Be sure the cakes are fully baked before removing them from the oven. If they’re not fully baked in the centre, they’ll sink in the middle after you remove them from the oven.
- Difficulty frosting the cake:
- Be sure the texture of your frosting is soft enough that it will easily glide over the surface of the cake without difficulty.
- It’s a good idea to refrigerate the cake layers before frosting to make frosting the cake easier (the layers will be firmer after refrigerating).
- The cake is bulging on the sides or difficult to slice:
- Refrigerate the cake after placing the frosting between the layers and before frosting the outside of the cake. This will prevent the cake from settling too much and the sides from bulging.
- If the cake is difficult to slice because it’s too soft, refrigerate for 30 minutes to an hour before slicing.

Here’s a list of the kitchen equipment you’ll need to make this homemade vanilla cake recipe (paid links):
- Stand Mixer OR Hand Mixer and some mixing bowls
- measuring cups and spoons
- liquid measuring cups
- Silicone Spatula
- 8 or 9 inch cake pans (round)
- Cooling Racks
- Offset Spatula
- Bench Scraper
- piping bag
- open star piping tip

Here’s a list of the ingredients you’ll need to make this easy vanilla cake recipe (paid links):
FOR THE CAKE LAYERS:
- 1-2 tablespoons each, butter and flour for preparing the cake tins
- 1 cup unsalted butter softened to room temperature
- 2 cups granulated sugar
- 3 large eggs at room temperature
- 3 egg yolks at room temperature
- 1 1/4 cups buttermilk at room temperature
- 3 tablespoons vegetable oil
- 1 teaspoon vanilla bean paste or use the seeds from 1 vanilla bean
- 3 1/4 cups all purpose flour
- 1 tablespoon baking powder
- 1 1/2 teaspoons baking soda
- 1 teaspoon salt
FOR THE VANILLA BUTTERCREAM FROSTING:
- 2 cups unsalted butter softened
- 6 to 7 cups powdered sugar sifted to remove lumps
- a pinch of salt
- 2 teaspoons vanilla bean paste or the seeds from one whole vanilla bean
- 4 tablespoons heavy cream
To take this easy vanilla cake to the next level, give one of these creative variations a try!
- Citrus: Add lemon, lime, or orange zest to the batter for a refreshing citrus note.
- Spices: Mix in a pinch of cinnamon or nutmeg for a warm, spicy flavour that contrasts nicely with the sweetness of the vanilla.
- Extracts: Experiment with other extracts like almond or coconut (in addition to vanilla) for a unique flavour profile.
- Fruit: Fold in fresh berries or chopped fruit to add natural sweetness and a bit of texture. OR, try our Berry Chantilly Cake for a berry-inspired cake similar to this one.
Time needed: 3 hours
Here’s how to make the BEST homemade vanilla cake recipe!
- Prepare your pans.
Grease and flour two 9-inch round cake pans (with high sides) or three 8-inch round cake pans (with high sides), lining the bottoms with parchment paper rounds for easy release. Preheat your oven to 325 degrees Fahrenheit (165 degrees Celsius).
- Cream the butter and sugar.
In the bowl of your stand mixer (or in a large bowl using a hand mixer), whip the butter and sugar together on medium high speed until very fluffy and creamy. The sugar will start to dissolve into the butter a little bit during this creaming process, so you should be able to feel the grains of sugar getting smaller.
- Add the eggs and egg yolks.
Add the eggs and egg yolks one at a time, mixing well after each addition. Scrape down the sides of the bowl regularly at this stage to make sure everything is mixed well.
- Add the oil and vanilla.
Mix in the oil and vanilla bean paste on low speed.
- Add the buttermilk and dry ingredients alternatively.
Measure the buttermilk into a liquid measuring cup and and set aside. Measure and sift the flour, baking powder, baking soda, and salt into a separate bowl and combine with a wire whisk. Add the dry ingredients and the buttermilk alternatively while the mixer is running on low speed. Add 1/3 of the dry ingredients, half the milk, another 1/3 of the dry ingredients, the other half of the milk, and the remaining dry ingredients.
- Finish mixing the batter.
Turn the speed of the mixer to medium-low and mix until the batter is smooth (about one minute).
- Bake the cakes.
Pour the batter into the prepared cake pans and bake at 325 degrees Fahrenheit (165 degrees Celsius) for about 29-34 minutes, or until a toothpick inserted into the middle of one of the cakes comes out clean.
- Cool and prepare to frost.
Cool the cakes in the pans for about 5-7 minutes and then turn them out onto cooling racks to cool completely. Once the cakes are cool, store them wrapped in plastic wrap in the fridge until ready to frost. They should be refrigerated for at least 1 hour before frosting.
Here’s how to make the fluffiest buttercream frosting for this easy homemade vanilla cake recipe:
- Beat the butter on high speed until light and fluffy and smooth.
- Sift the powdered sugar and add it slowly, one cup at a time, mixing after each addition until incorporated.
- Add the vanilla bean paste, salt, and then slowly add in the heavy cream, one tablespoon at a time, until incorporated and the mixture reaches spreadable consistency.
- Mix the frosting on medium-high speed for about 1-2 minutes, or until the frosting becomes very smooth and spreadable.
- Lastly, frost the cake according to the recipe directions!
Can I use cake flour for this homemade vanilla cake instead of all purpose flour?
Cake flour can be used. It has a lower protein content than all purpose flour, and it creates a softer cake than all purpose flour does.
Can I make vanilla cupcakes with this recipe instead of a layer cake?
We recommend using a cupcake recipe like this Vanilla Bean Cupcakes with Fluffy Vanilla Bean Frosting instead of adapting this recipe into cupcakes.
Can I make this homemade vanilla cake gluten-free?
If you have a gluten-free flour that performs the same way as all purpose flour does, feel free to use it in this recipe.
How do I store this easy vanilla cake?
Store this cake in the refrigerator for up to 2 days and in the freezer in an airtight container for a few months.
Can you freeze homemade vanilla cake?
Yes, freeze it in an airtight container, or slice it and freeze the slices with pieces of parchment paper between them in an airtight container.
Can I make this homemade vanilla cake ahead of time?
Yes. You can make the layers and store them wrapped in plastic wrap in the fridge for a few days before making the vanilla buttercream frosting, assembling, and serving.
What makes a homemade vanilla cake moist and fluffy?
For a fluffier cake, be sure to use a bit of vegetable oil in addition to the butter. This makes the cake lighter and more tender than butter alone.
What can I use instead of buttermilk in this recipe?
Use the same measurement of whole milk and a dash of vinegar as a substitute for buttermilk in this recipe.
We hope you love this easy homemade vanilla cake recipe as much as we do! Let us know in the comments below, what’s your favourite go-to cake recipe? We’d love to know!

More Cake Recipes
- Lemon Blueberry Cake
- Strawberry Shortcake
- White Cake
- Chocolate Layer Cake
- New York Cheesecake
- Berry Chantilly Cake
- Perfect Lemon Pound Cake
- Easy Pumpkin Cake
- Angel Food Cake
- Best Red Velvet Cake
- Chocolate Vanilla Marble Pound Cake
Watch the video below to see exactly how we make this recipe. You can find many more deliciously simple recipe videos on our YouTube channel!
If you made this, share a photo!
Are you trying this recipe? Use the comment form below to share your take; now with support for image uploads and comment voting!
Vanilla Cake
Recipe: Equipment
Recipe: Ingredients
For the cake:
- 1-2 tablespoons each, butter and flour for preparing the cake tins
- 1 cup unsalted butter softened to room temperature
- 2 cups granulated sugar
- 3 eggs at room temperature
- 3 egg yolks at room temperature
- 1 1/4 cups buttermilk at room temperature
- 3 tablespoons vegetable oil
- 1 teaspoon vanilla bean paste or use the seeds from 1 vanilla bean
- 3 1/4 cups all purpose flour
- 1 tablespoon baking powder
- 1 1/2 teaspoons baking soda
- 1 teaspoon salt
For the frosting:
- 2 cups unsalted butter softened
- 6 to 7 cups powdered sugar sifted to remove lumps
- a pinch of salt
- 2 teaspoons vanilla bean paste or the seeds from one whole vanilla bean
- 4 tablespoons heavy cream
Recipe: Instructions
For the cake:
- Grease and flour two 9-inch round cake pans (with high sides) or three 8-inch round cake pans (with high sides), lining the bottoms with parchment paper rounds for easy release. Preheat your oven to 325 degrees Fahrenheit (165 degrees Celsius).
- In the bowl of your stand mixer (or in a large bowl using a hand mixer), whip the butter and sugar together on medium high speed until very fluffy and creamy. The sugar will start to dissolve into the butter a little bit during this creaming process, so you should be able to feel the grains of sugar getting smaller.
- Add the eggs and egg yolks one at a time, mixing well after each addition. Scrape down the sides of the bowl regularly at this stage to make sure everything is mixed well.
- Mix in the oil and vanilla bean paste on low speed.
- Measure the buttermilk into a liquid measuring cup and and set aside.
- Measure and sift the flour, baking powder, baking soda, and salt into a separate bowl and combine with a wire whisk.
- Add the dry ingredients and the buttermilk alternatively while the mixer is running on low speed. Add 1/3 of the dry ingredients, half the milk, another 1/3 of the dry ingredients, the other half of the milk, and the remaining dry ingredients.
- Turn the speed of the mixer to medium-low and mix until the batter is smooth (about one minute).
- Pour the batter into the prepared cake pans and bake at 325 degrees Fahrenheit (165 degrees Celsius) for about 29-34 minutes, or until a toothpick inserted into the middle of one of the cakes comes out clean.
- Cool the cakes in the pans for about 5-7 minutes and then turn them out onto cooling racks to cool completely.
- Once the cakes are cool, store them wrapped in plastic wrap in the fridge until ready to frost. They should be refrigerated for at least 1 hour before frosting.
For the frosting:
- Beat the butter on high speed until light and fluffy and smooth.
- Sift the powdered sugar and add it slowly , one cup at a time, mixing after each addition until incorporated.
- Add the vanilla bean paste, salt, then slowly add the heavy cream one tablespoon at a time, until incorporated and the mixture reaches spreadable consistency.
- Mix the frosting on medium-high speed for about 1-2 minutes, or until the frosting becomes very smooth and spreadable.
- Reserve about 1 1/2 cups of frosting for the crumb coat (the initial coat of frosting) and place the rest of the frosting in a piping bag fitted with a star tip. Set aside.
- Trim the cakes (if necessary) to level them, using a serrated knife. Place one cake, right side up, on a plate or cake board.
- Add a large dollop of frosting on top and spread it out to reach the edges of the cake. Place the other cake on top of the frosting, upside down so the flat side faces up.
- Add the remainder of the frosting (the 1 1/2 cup you reserved for the crumb coat) to the top of this cake and spread it over the top and down the sides of the cake, making sure to smooth it out to fill in any holes or cracks in the cake to create a very smooth edge.
- Remove any excess frosting – it’s fine if the cake is showing through, you’ll cover this with the final coat of frosting.
- Place the cake in the fridge to chill for about 45 minutes. Refrigerating the cake will cause the butter in the frosting to harden and it will create the perfect canvas for the second coat of frosting.
- Remove the cake from the fridge and get ready to frost! If you’re not into rosettes you can feel free to simply spread the remaining frosting on if you’d prefer that look.
- For the rosettes, pipe a round, spiral shape beginning from the middle and moving to the outside.
- Start piping the rosettes on the side of the cake and begin at the very bottom. Pipe a row of rosettes along the bottom and then offset your second row so it fills in the empty spaces.
- On the top of the cake, pipe the rosettes around the outside first and then work your way in, offsetting the rows to fill in the gaps. Make sure you pipe the rosettes close together so they’re almost overlapping each other. This will ensure you don’t have many empty spaces to fill. It’s also a good idea to end your rosettes in the gap where the next row will fill. This will hide the scraggly ends of the rosettes and create a really clean look.
- Once you've finished frosting your rosettes, chill the cake for another 30 minutes to an hour before serving to set the frosting. After you pull it out of the fridge, it will be quite hard if it's been in there for more than 30 minutes so it's a good idea to let it sit at room temperature again for about 15 minutes before slicing and serving.
Recipe: Notes
Storage Instructions
Store the cake in the fridge until ready to serve (let sit out at room temperature for 15 minutes before slicing to let the frosting relax).Make Ahead Instructions
To make this cake ahead of time, follow the recipe directions and store it in the fridge for about 24 hours before serving. Alternatively, make the cake layers and store them in the fridge for up to 2 days or freezer for up to 3 months before making the frosting and assembling the cake.Freezer Instructions
Freeze the cake whole for up to 3 months and defrost it in the fridge until thawed. Alternatively, cut slices and freeze them with layers of parchment paper between them to prevent them from sticking to each other.Recipe: Nutrition
Notice: Nutrition is auto-calculated, using Spoonacular, for your convenience. Where relevant, we recommend using your own nutrition calculations.
Does this batter do well as cupcakes?
We’ve never tried it ourselves so I couldn’t tell you. Sorry! If you try, please let us know.
So I just made your cake for a friend algoodbye party and I followed your recipe to the t. My oven was the right temperature. The cake looked lovley mixing, nice a fluffy and I evenly put it into 2 9 inch cake pans. However, it sunk and I was so sad. I looked up why it could have sunk and (according to Google) it was too much leavening. Would you suggest cutting back on the baking soda and baking powder? Advice please. (Cake still tasted good!)
Cakes typically sink when they’re underbaked. You could try using an oven thermometer to check if your oven goes over the set temperature (this could cause the outside to bake & brown while the middle is still underbaked) and also perform the toothpick test in the middle of the cake before taking it out of the oven to check if it’s fully baked.
Thanks Guys, Your Recipe Was Too Fantastic. Me and My Family Loved it. I Will Share your Rrecipe with my friends. Hope they will love it too.
Thank you so much!! Really happy to hear it was a hit!
Hmmm, this gives me an idea of what to ask my wife to prepare on our daughter’s coming birthday. Thanks for sharing this
You’re welcome!! Let us know how it goes!🙂
Well this just completely blew up in my oven. A was skeptical of the tablespoon (!) of backing power. Totally over ran the pans, then of course is sinking in the middle now. Wasted some good vanilla beans on this. Should have listed to my gut and only donea teaspoon.
Sorry this happened…what size pans did you use? It sounds like your pans were too small for this recipe. I recommend using pans with high sides as this recipe rises a lot, which makes for a fluffy cake.
I’m just curious after reading many reviews, I have not seen a comment of anyone actually made this recipe… . did anyone?
I just made it again for a friend’s birthday 2 days ago. Let me assure you, it’s delicious!! 🙂
Hi, Nati. I made this cake recipe. Was disappointed. Cake was EXTREMELY dry!!! Even my husband said how dry it was . Made a different frosting. It was a cream cheese buttercream vanilla bean frosting. The frosting was delish, cake, not so delish. I guess I will keep searching for that perfect vanilla cake. 😔