
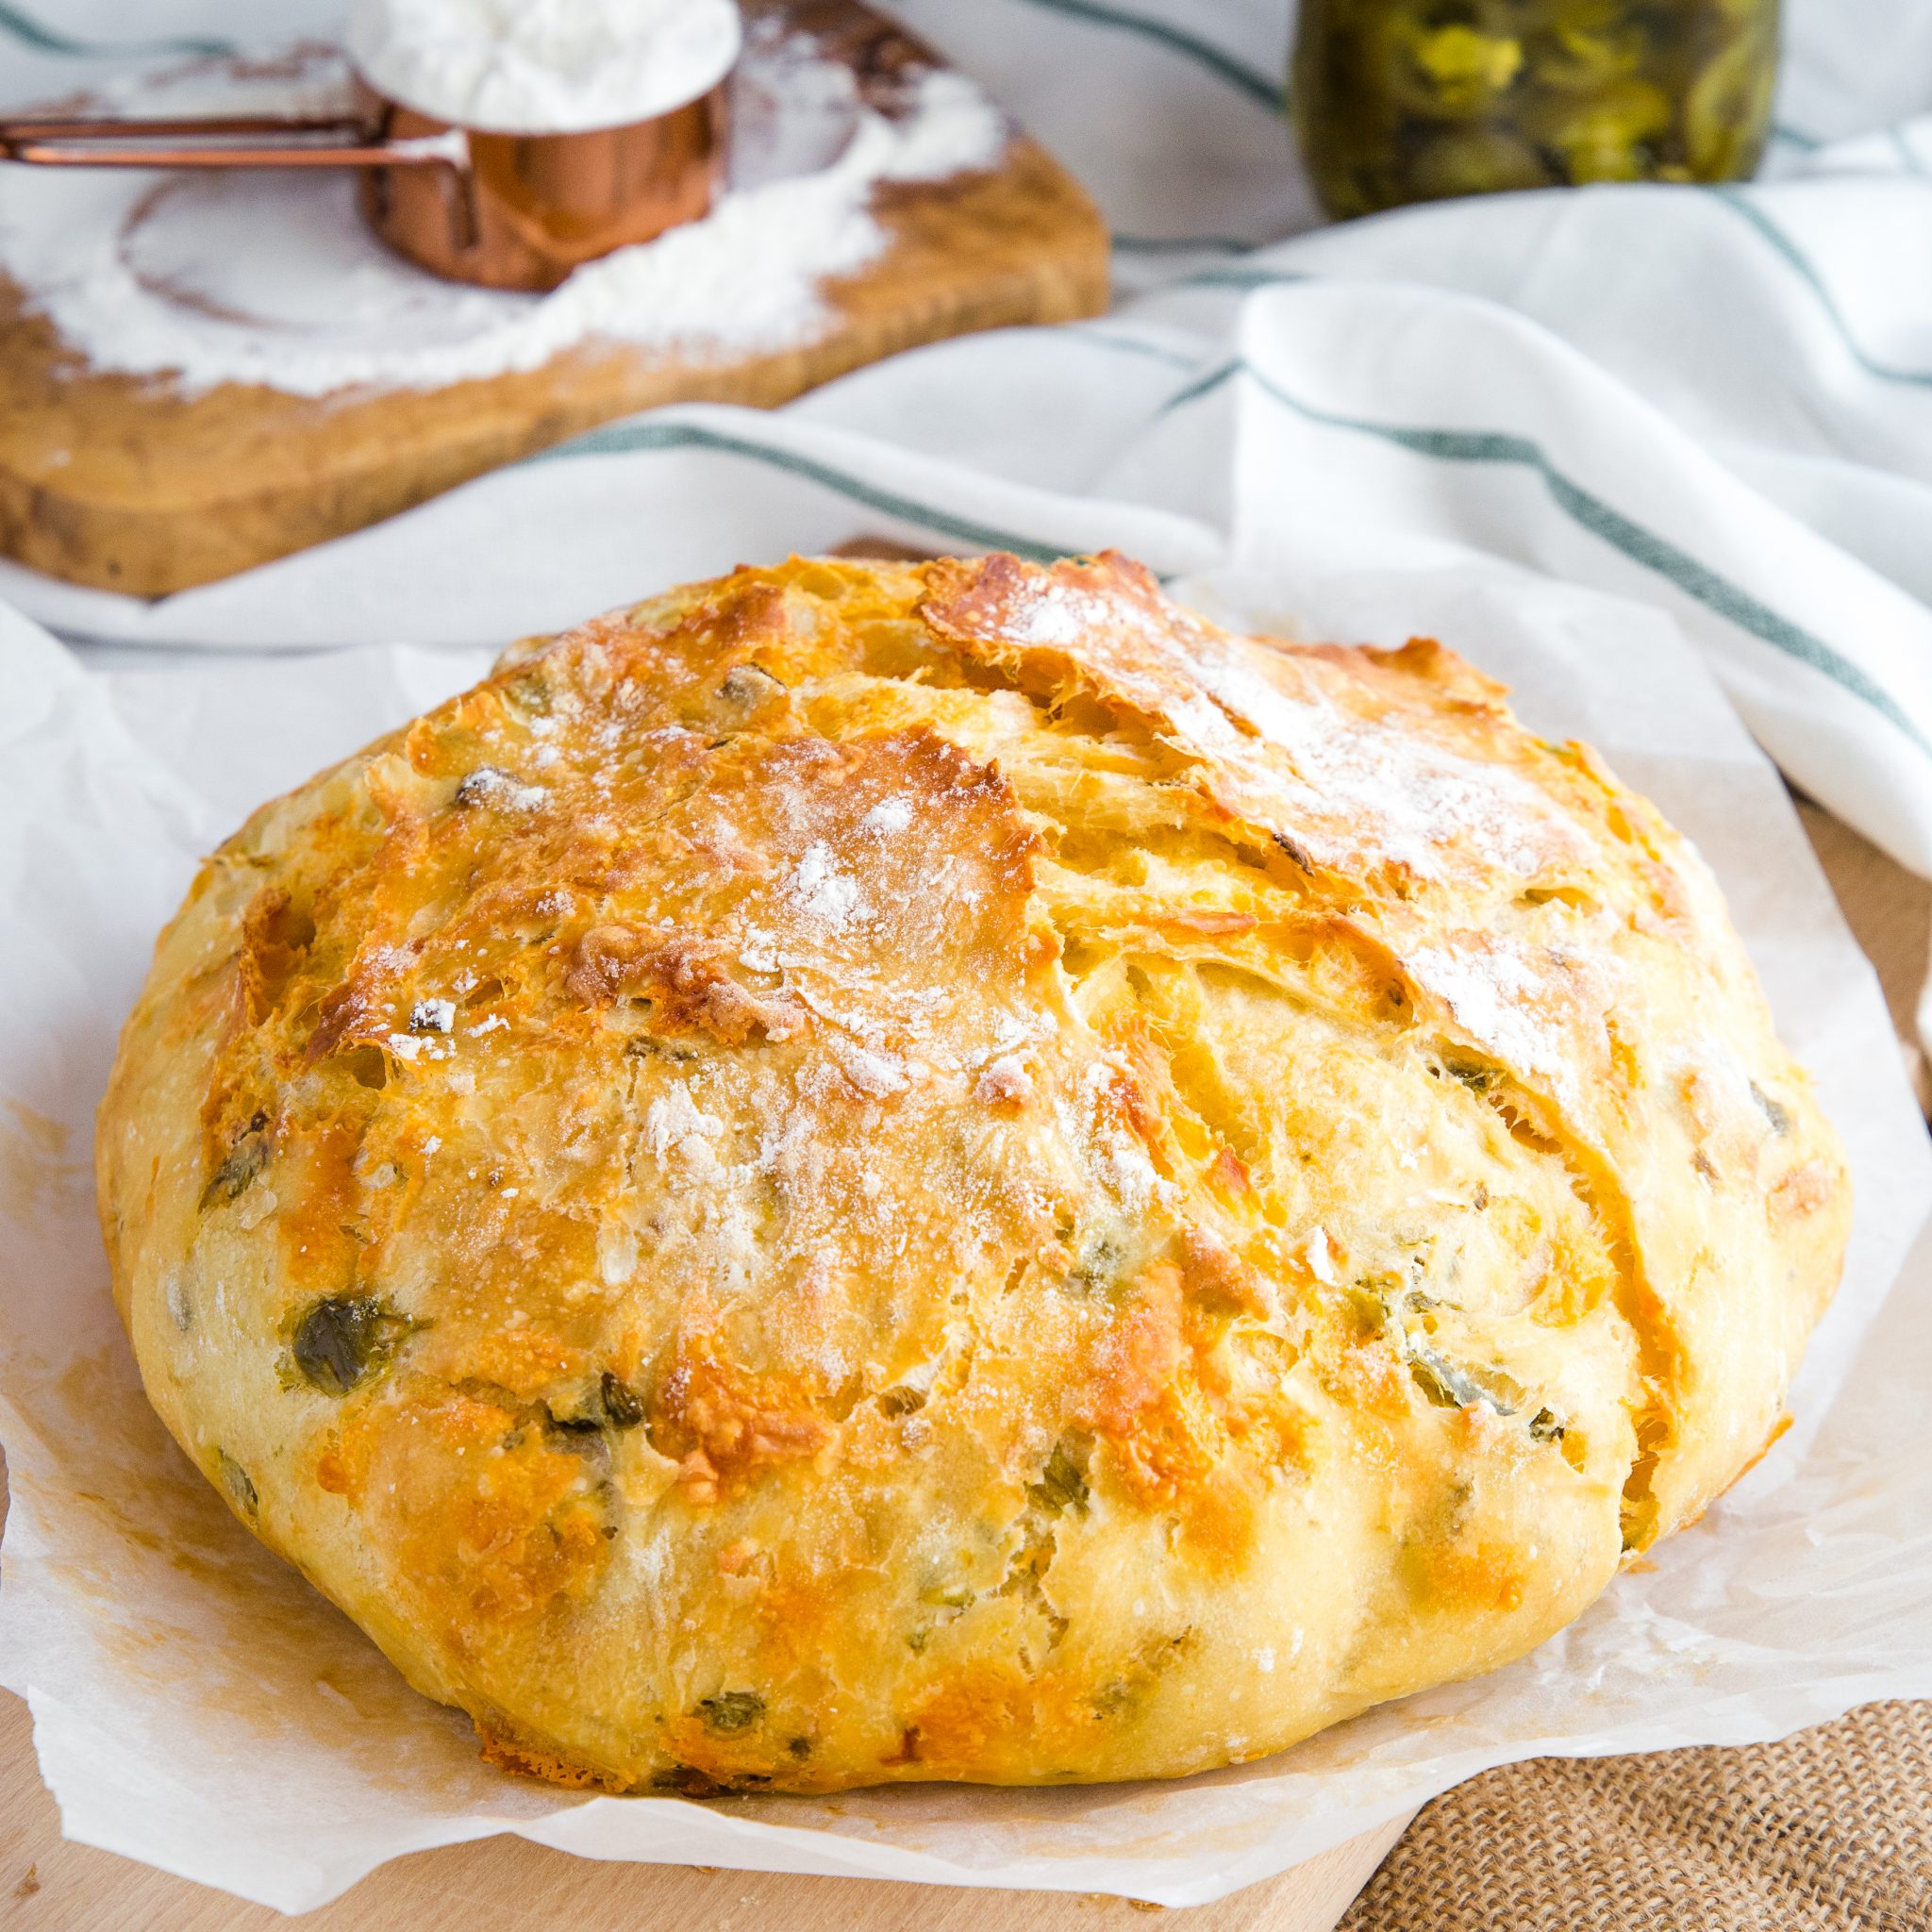
This Easy No Knead Jalapeno Cheese Artisan Bread is the BEST savoury bread for sandwiches! It’s packed with spicy pickled jalapeños and real cheddar cheese, and it’s SO easy to make!

NEVER MISS A POST! FOLLOW ME ON:
FACEBOOK | PINTEREST | INSTAGRAM | TWITTER
 This No Knead Jalapeno Cheese Artisan Bread is a savoury version of my Easy No Knead Artisan Bread that I shared as one of my very first recipes on this blog! One of my favourite variations of that recipe is this No Knead Jalapeno Cheese Artisan bread – it’s SO cheesy and spicy, and it’s GREAT For sandwiches!! And the best part? It’s SO easy to make it’s almost embarrassing, so anyone can do it! And with my pro tips below, you’ll be a total Artisan Bread pro!

Pro tip#1: Pre-heat your Dutch Oven pot before baking.
This bread is baked in an oven-safe Dutch Oven pot which traps in steam, making the crust of the loaf extra crispy and golden brown! If you’re looking for a great Dutch Oven pot, I will tell you that it’s one of the best investments you can ever make for your kitchen – mine is a total beauty from Le Creuset (affiliate link) and I use it multiple times a week throughout the year for soups, stews, sauces, curries, and of course for baking this bread (if you want my original Dutch Oven Crusty Bread recipe, get it HERE!). A pot like this one is definitely a financial investment, but considering how much I use mine and considering its high quality, it’s definitely a worthy investment that will last you for 10 or 20 years. I’ve also used similar cast iron pots from other brands, like THIS ONE from KitchenAid and THIS ONE from Lodge Cast Iron (both affiliate links) if you’re looking for something a little less expensive but still high quality – they’re both great!
Pro Tip #2: Shape your loaf firmly but gently and dust the top of the loaf with flour.
Creating a round shape will help the loaf bake evenly and dusting the top with flour will create that gorgeous, bakery-style appearance that everyone loves!
EASY NO-FAIL HOMEMADE BREAD RECIPES AND BAKING TIPS
Get my easy no-fail bread baking e-cookbook!

Why you should NEVER cut into a hot loaf of bread
Pro Tip #3: Let the loaf cool completely (or almost) before cutting into it!!
Resist the urge to slice the bread while it’s hot. Did you know that after removing a loaf of bread from the oven it continues to bake inside as it cools?? Slicing into this gorgeous loaf too early will cause the inside of the loaf to be under-cooked and gummy. Letting the loaf cool completely before slicing ensures the perfect fluffy texture when you slice into it!

NEVER MISS A POST! FOLLOW ME ON:
FACEBOOK | PINTEREST | INSTAGRAM | TWITTER
I hope you love this No Knead Jalapeno Cheese Artisan Bread as much as we do! Let me know in the comments below, what’s your favourite homemade bread recipe? I’d love to know!
KITCHEN PRODUCTS I RECOMMEND:
Looking for even more delicious bread recipes? You’ll LOVE these:
-
Garlic Butter Dinner Rolls
-
Healthier Cornbread
-
Pumpkin Cornbread Muffins
-
Easy No Knead Artisan Bread
-
Easy No Knead Cinnamon Raisin Artisan Bread
EASY NO-FAIL HOMEMADE BREAD RECIPES AND BAKING TIPS
Get my easy no-fail bread baking e-cookbook!
Recipe Video
Watch the video below to see exactly how I make this quick snack. You can find more delicious recipe videos on my YouTube channel
If you made this, share a photo!
Are you trying this recipe? Use the comment form below to share your take; now with support for image uploads and comment voting!
Easy No Knead Jalapeno Cheese Artisan Bread
Recipe: Ingredients
- 3 cups all purpose flour
- 1/2 teaspoon instant yeast
- 2 teaspoons sea salt
- 1 1/2 cups sharp cheddar cheese, grated
- 1/2 cup sliced pickled jalapenos (or more, if you wish!)
- 1 1/2 cups water at room temperature
Recipe: Instructions
- Start with a large bowl and a wooden spoon, and add your flour to the bowl. Measure the yeast and add it to one side of the bowl. Measure the salt and add it to the other side.
- Using a wooden spoon, stir the yeast into the flour on its side of the bowl first and then stir the salt into the flour on its side of the bowl. This will prevent the salt mixing directly with the yeast. Give the whole mixture a few good stirs to make sure everything is combined.
- Add the sharp cheddar cheese and the sliced jalapenos to the flour mixture and stir until well coated and evenly distributed.
- Once the dry ingredients are combined, measure the water. Make sure the water is at room temperature; water that is too warm or too cold can kill the yeast and prevent the bread from rising at all. Pour the water in and stir with a wooden spoon. The dough will be rough and a bit sticky, but that's normal.
- Stir until all the flour is combined. This is not normal bread dough (there's no kneading involved in this recipe), so you don't need to be too concerned about the appearance of the dough at this point. Just make sure the ingredients are combined well.
- Cover the bowl with plastic wrap. It's a good idea to ensure there's adequate space left in the bowl for the dough to at least double in size. Place the bowl in a warm, draft-free place and let it rise for 12-18 hours.
- After the dough has risen for 12-18 hours, preheat oven to 450 degrees Fahrenheit. Place your Dutch oven with the lid on in the cold oven and let it heat up with the oven.
- Place a piece of parchment paper on the counter and dust it with flour. Rub flour on your hands and scrape the dough away from the sides of the bowl, gathering it in your hands as best you can (it may feel kind of fluid and not at all like regular bread dough) and forming it into a circular loaf on the parchment paper. Don't worry if it still looks a little rough in places. This lends to the rustic look of this loaf.
- Once you have it shaped, the dough needs to undergo a second rise (much shorter than the first). The goal is to handle the dough as little as possible at this stage because any amount of tugging at the rough can cause it to deflate after it has undergone its second rise. The next few steps will help prevent this. But don't worry if it deflates a bit. This bread dough is pretty forgiving.
- Sprinkle flour over the top of the loaf and loosely cover it with plastic wrap to prevent a skin from forming over the dough. The flour also prevents the plastic wrap from sticking to the dough so when you take it off at the end of the rise, it doesn't disturb the dough and wreck the rustic shape you've created. Let the dough rise for about 45 minutes. Your oven will also be preheating during this time (and so will your pot).
- Once 45 minutes have passed remove the plastic wrap from the dough and trim the parchment paper into a circle closely around the dough. If it doesn't look like the dough has risen that much, don't worry about it. The loaf will puff up a bit when it hits the heat of the oven.
- Remove the preheated pot from the oven and transfer the dough into the pot as carefully as possible by handling only the parchment paper. Place the lid on the pot and return it to the oven for 30 minutes. Don't open the oven during this time, and certainly don't take the lid off the pot; the crispness of the crust develops because of the steam that builds up in the pot during this 30 minutes.
- After 30 minutes have passed, remove the lid from the pot and continue baking for another 15 minutes. After the 15 minutes have passed, remove the pot with bread from the oven and place it on a wire rack to cool. You'll probably hear it crackling as it cools - this is normal.
- If you can, resist the urge to cut into the bread until it has pretty much cooled completely. The bread continues to bake on the inside even after it has been removed from the oven and cutting it too early could result in the inside becoming gummy or rubbery.
Recipe: Notes
Quick rise method:
- Add 2 1/2 teaspoons of active dry yeast instead of the amount listed in the recipe.
- Rise for 2 hours and follow the recipe directions after the rise time as written.
No Knead Bread Troubleshooting Tips:
- If your dough seems too fluid after the first rise, simply add 1/3 cup of flour to the top of the dough and mix it in, shaping the loaf into a round shape to rise again while the oven pre-heats.
- If your loaf falls or flattens during the second rise, simply re-shape before baking into as tight a ball as possible (creating surface tension should prevent the dough from falling).
- Add 1 tablespoon of Vital Wheat Gluten to the dough with the flour to create a very voluminous dough that rises beautifully every single time and isn't too dense.
- If the bottom crust of your bread burns or becomes too hard or tough, it's likely that the bottom burner of your oven is too hot OR you're using a pot that's black on the inside (these conduct heat more efficiently than one that's a light colour on the inside). Try lowering your oven temperature by 25 degrees, using the convection setting, or using a different pot that's light in colour on the inside.
- Use an oven thermometer to make sure your oven temperature is correct. If your oven runs hot, lower the temperature of your oven by 25 degrees to be sure you don't burn the bread.
Recipe: Nutrition
Notice: Nutrition is auto-calculated, using Spoonacular, for your convenience. Where relevant, we recommend using your own nutrition calculations.
Question… I have “Activated Yeast” not “Instant Yeast”…… Do I do it the same?
Thank you
Yes, both work in this recipe. Be sure to dissolve the active dry yeast in the water instead of putting it the flour like you would the instant yeast. 🙂
Hello! I made your cinnamon raisin bread and it was sooooo amazing and easy. I’ll never buy it at the store again! Curious though, that recipe called for dry active yeast and did not state to dissolve it in warm water before adding it to the mix. But above you stated you can use both dry active and instants yeast, but to dissolve the dry active in water… is this step necessary? Just curios. Can’t wait to make the jalapeño cheese bread next!!! Thank you so much!
If you use instant yeast there’s no need to dissolve it in water. If you use active yeast you don’t have to dissolve it in water although I find it helps the rise. It’s personal preference and sometimes depends on the brand of yeast you use.
Do you have to let the yeast activate first? Would you use the same amount of active yeast?
You don’t have to activate instant yeast. Yes, you can use instant yeast and active dry yeast interchangeably without having to adjust the quantity, the only difference is that the instant yeast will make the bread raise faster because it’s made of smaller granules. Happy baking!
Is there a way to make this without a dutch oven?
I would love to make this, but don’t have that kitchen tool.
Do you have any oven-safe covered pot? Any covered pot should work.
I tried making this bread and I’m not sure what I did wrong. It didn’t come out as thick as I was expecting. If it rises 20 hrs infread of 18 does that impact the yeast? I’ve never really made bread before so this is a new thing for me.
After it baked it looked crusty and awesome but after leaving it to cool overnight it became…soggy? I had wrapped it in plastic wrap on the counter. It tastes alright but the soggy is affecting the taste. I want to the again, but some advice would be helpful. Thanks!
I wouldn’t store it in plastic as it cools…this is what probably made it soggy as the steam couldn’t escape. You can store it covered with a clean kitchen towel overnight.
The flavor of this is just wonderful. I would like to take it to a party but want to know how to handle it so that it is a good at the gathering as it is at home. How do I keep it warm and scrumptious later?
I’d recommend baking it as close to the time you want to serve it as possible, or at least on the same day you’ll serve it 🙂
Mine just came out of the oven!!! I can’t wait to taste it! Jalapeño and cheddar is one of my favorite flavor combos.
Making this tomorrow..2 questions..do you shred or small chunk the cheese?
Do you pat dry the jalapenos? leave them whole? (sorry 3 ?) 🙂
Thanks for your help & for the great recipe!
Shredding the cheese works well 🙂
Weird question but I only have a cast iron Dutch oven. would that still work ok? If so do I need to adjust the time or temp? Thanks!
Yes, a cast iron dutch oven is great for this recipe!
So delicious! I was dubious about it being no-knead, but it was surprisingly chewy! The perfect bread for chili. I’m making it again, and am going to try grating the cheese smaller and chopping up jalapenos into pieces for better distribution.
Glad you liked it!
Based on flavor and ease of pulling all of the ingredients together I would have rated this five stars. It came together easily and rose beautifully overnight. However, when I took it out of the bowl to mold it into a rough artisan loaf shape the dough collapsed and looked like a pizza! And then it would not rise again during the 45 minute period suggested in the recipe. Nonetheless, I got it in my dutch oven and the smell while baking was amazing. Unfortunately, it came out looking like a flat focaccia bread. No way to slice this and use it for sandwiches. The taste was still incredible and I will happily nibble on leftovers all week, Any thoughts on how I can fix this? I live in southern Florida so not sure if humidity had a role in causing the dough to collapse. Would it be possible to let the dough rise in the dutch oven and just slide that in the oven when ready to bake? I want to make this again!!
That would work, although preheating the dutch oven is what creates the crispy crust. It sounds like your dough was too wet, and perhaps the humidity did play a role. Try adding a touch more flour next time and it might be better. This has never happened to me, but we live in a drier climate.
I had a similar experience with the dough flattening out. I think the reason for my experience was that the pickled jalapenos add a lot of moisture. Next time I will drie them prior to adding them. Then I may also add a little extra flour.
I have been making this bread for over 2 years with no problems. This is the first time I made it in the summer. I also had problems with it looking like a pizza. I actually threw yesterday’s attempt in the garbage because it was so runny. Today’s was better but I had trouble transferring it to the dutch oven. After reading your comment, I am convinced it’s due to the humidity.
I would like to make smaller loaves of this to give to neighbors. When would you suggest I divide the dough?
I’d suggest you divide the dough after the first rise, before forming the loaf.
is that 1 1/2 cups grated, sliced or cubed cheese? thanks
grated cheese 🙂
Are you supposed to transfer it into the Dutch oven and dump it without parchment paper? I left mine on the bottom while baking and after baking it’s like baked into the bread and I can’t get it off! 😩
Hmm that’s really strange. I bake it both with and without and this has never happened. Perhaps try flouring the parchment paper a little better – it sounds like your dough must have been too sticky!
Are you sure you are using parchment paper and not wax paper? Parchment shouldn’t stick, whereas wax paper absolutely will…
I am so glad I found your posts made the walnut cranberry at Christmas for so many compliments that I was told I had to make it again so not even 4 days later made another loaf plus this jalapeño cheese one it was so easy and yummy. I ended up using the picked juice as part of the water to give it a kick it sure did have a kick. Thank you next one I will try is the everything loaf .
So glad you liked it! Thanks for taking the time to leave a comment! 🙂
Why do people post when they havent tried the recipe? I look at comments for advice on recipe from someone who actually made it, not looked at the picture and said “oh my goodness! Looks yummy!” I made it, it was great. That’s a useful comment. 😉
Thanks for the feedback! Glad you liked it!
Agree! Thanks for speaking out. I scroll and scroll until I can finally find a comment from someone who made it. Don’t comment if you haven’t made it yet!
I feel the same way. I can understand liking what the end product may be and being excited about making it. But I don’t understand how you can rate it when you haven’t even tried it yet.
This bread sounds SERIOUSLY delicious! Homemade is always amazing!
Thanks so much! 🙂
I didn’t read that it takes 12-18hrs. I started it at 11am and here i am at 1am baking it. Looks un real. I can’t believe i made bread. Thanks
This looks so good and easy. I wouldn’t share it
Me neither 😉
This bread sounds amazing. I love it when there is a little heat added.
Me too 😉
Oh my goodness! This bread is out of this world!! I looks and sounds amazing!! I can’t wait to make it for my family!!
Thanks!!
Oh my goodness! This bread looks absolutely amazing! I am ready for a slice right now!
Thanks!!
Jalapeno and cheddar baked bread is seriously one of my most favorite things EVER!!!! I love this!
Mine too! 🙂
My husband can not get enough of this bread! The recipe is so easy to follow!
Thanks so much! Glad he loves it! 🙂
Is there a way of making it in one evening rather than 18 hours?
You could increase the amount of yeast, although the flavour and texture of this loaf is best when the rise is slow.
I put my dough in my pressure cooker on yogurt setting for 3-4 hours. Works perfect!
Was this just for rising the bread, or cooking it?
Hi Can you make this bread without a Dutch oven.
Yes, you can bake this bread on a sheet pan. The crust won’t turn out quite the same, but it will still be delicious.