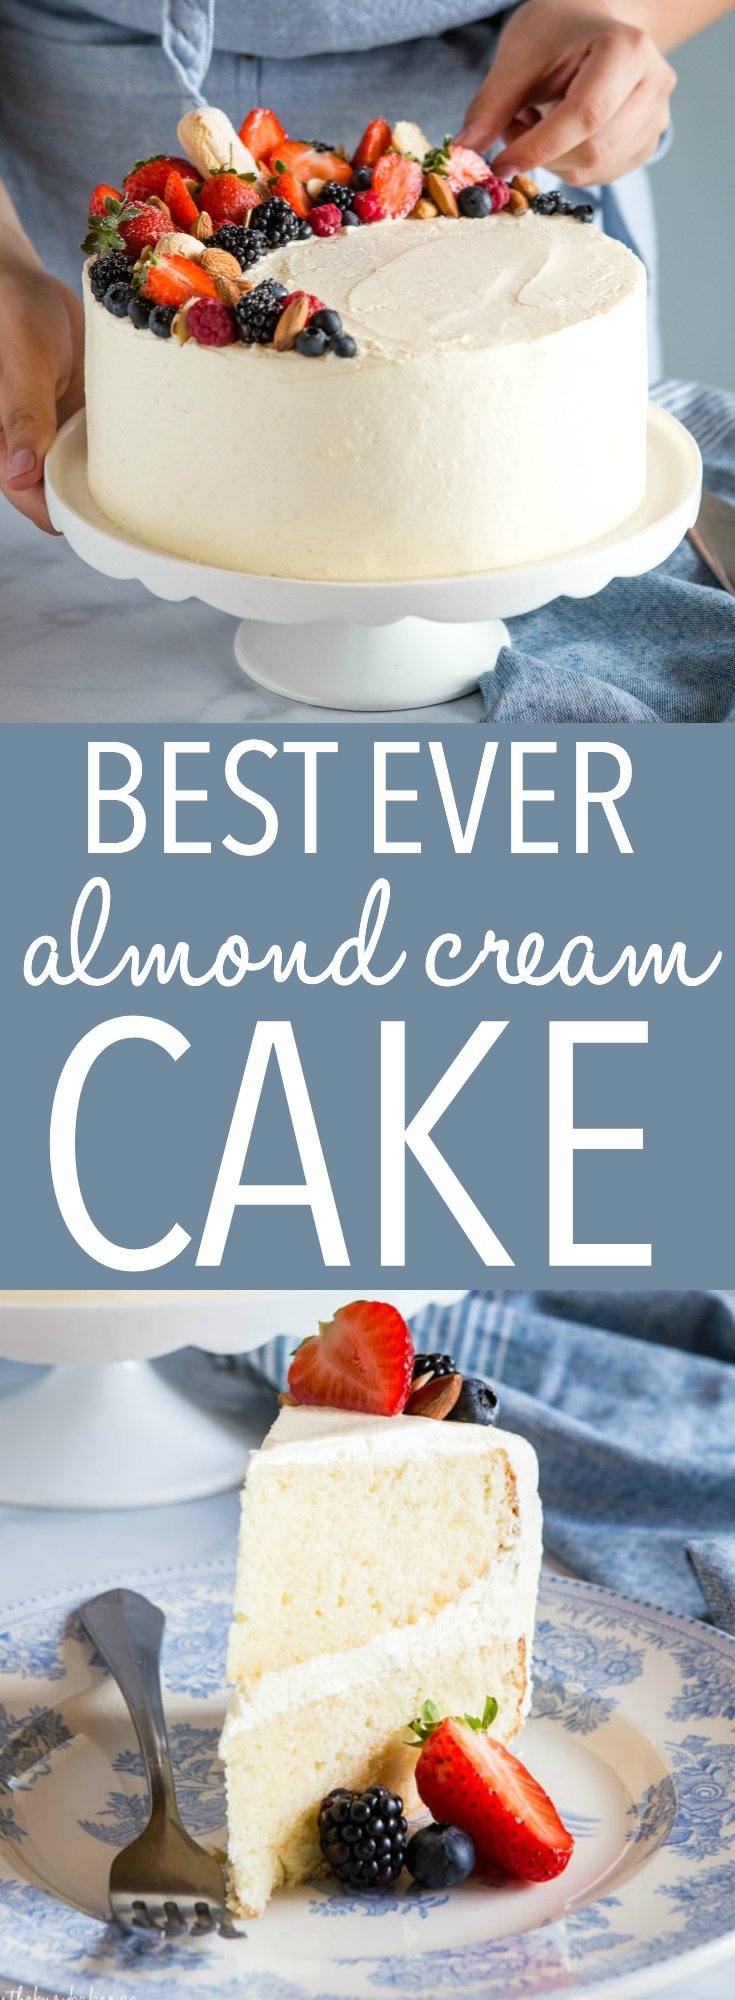
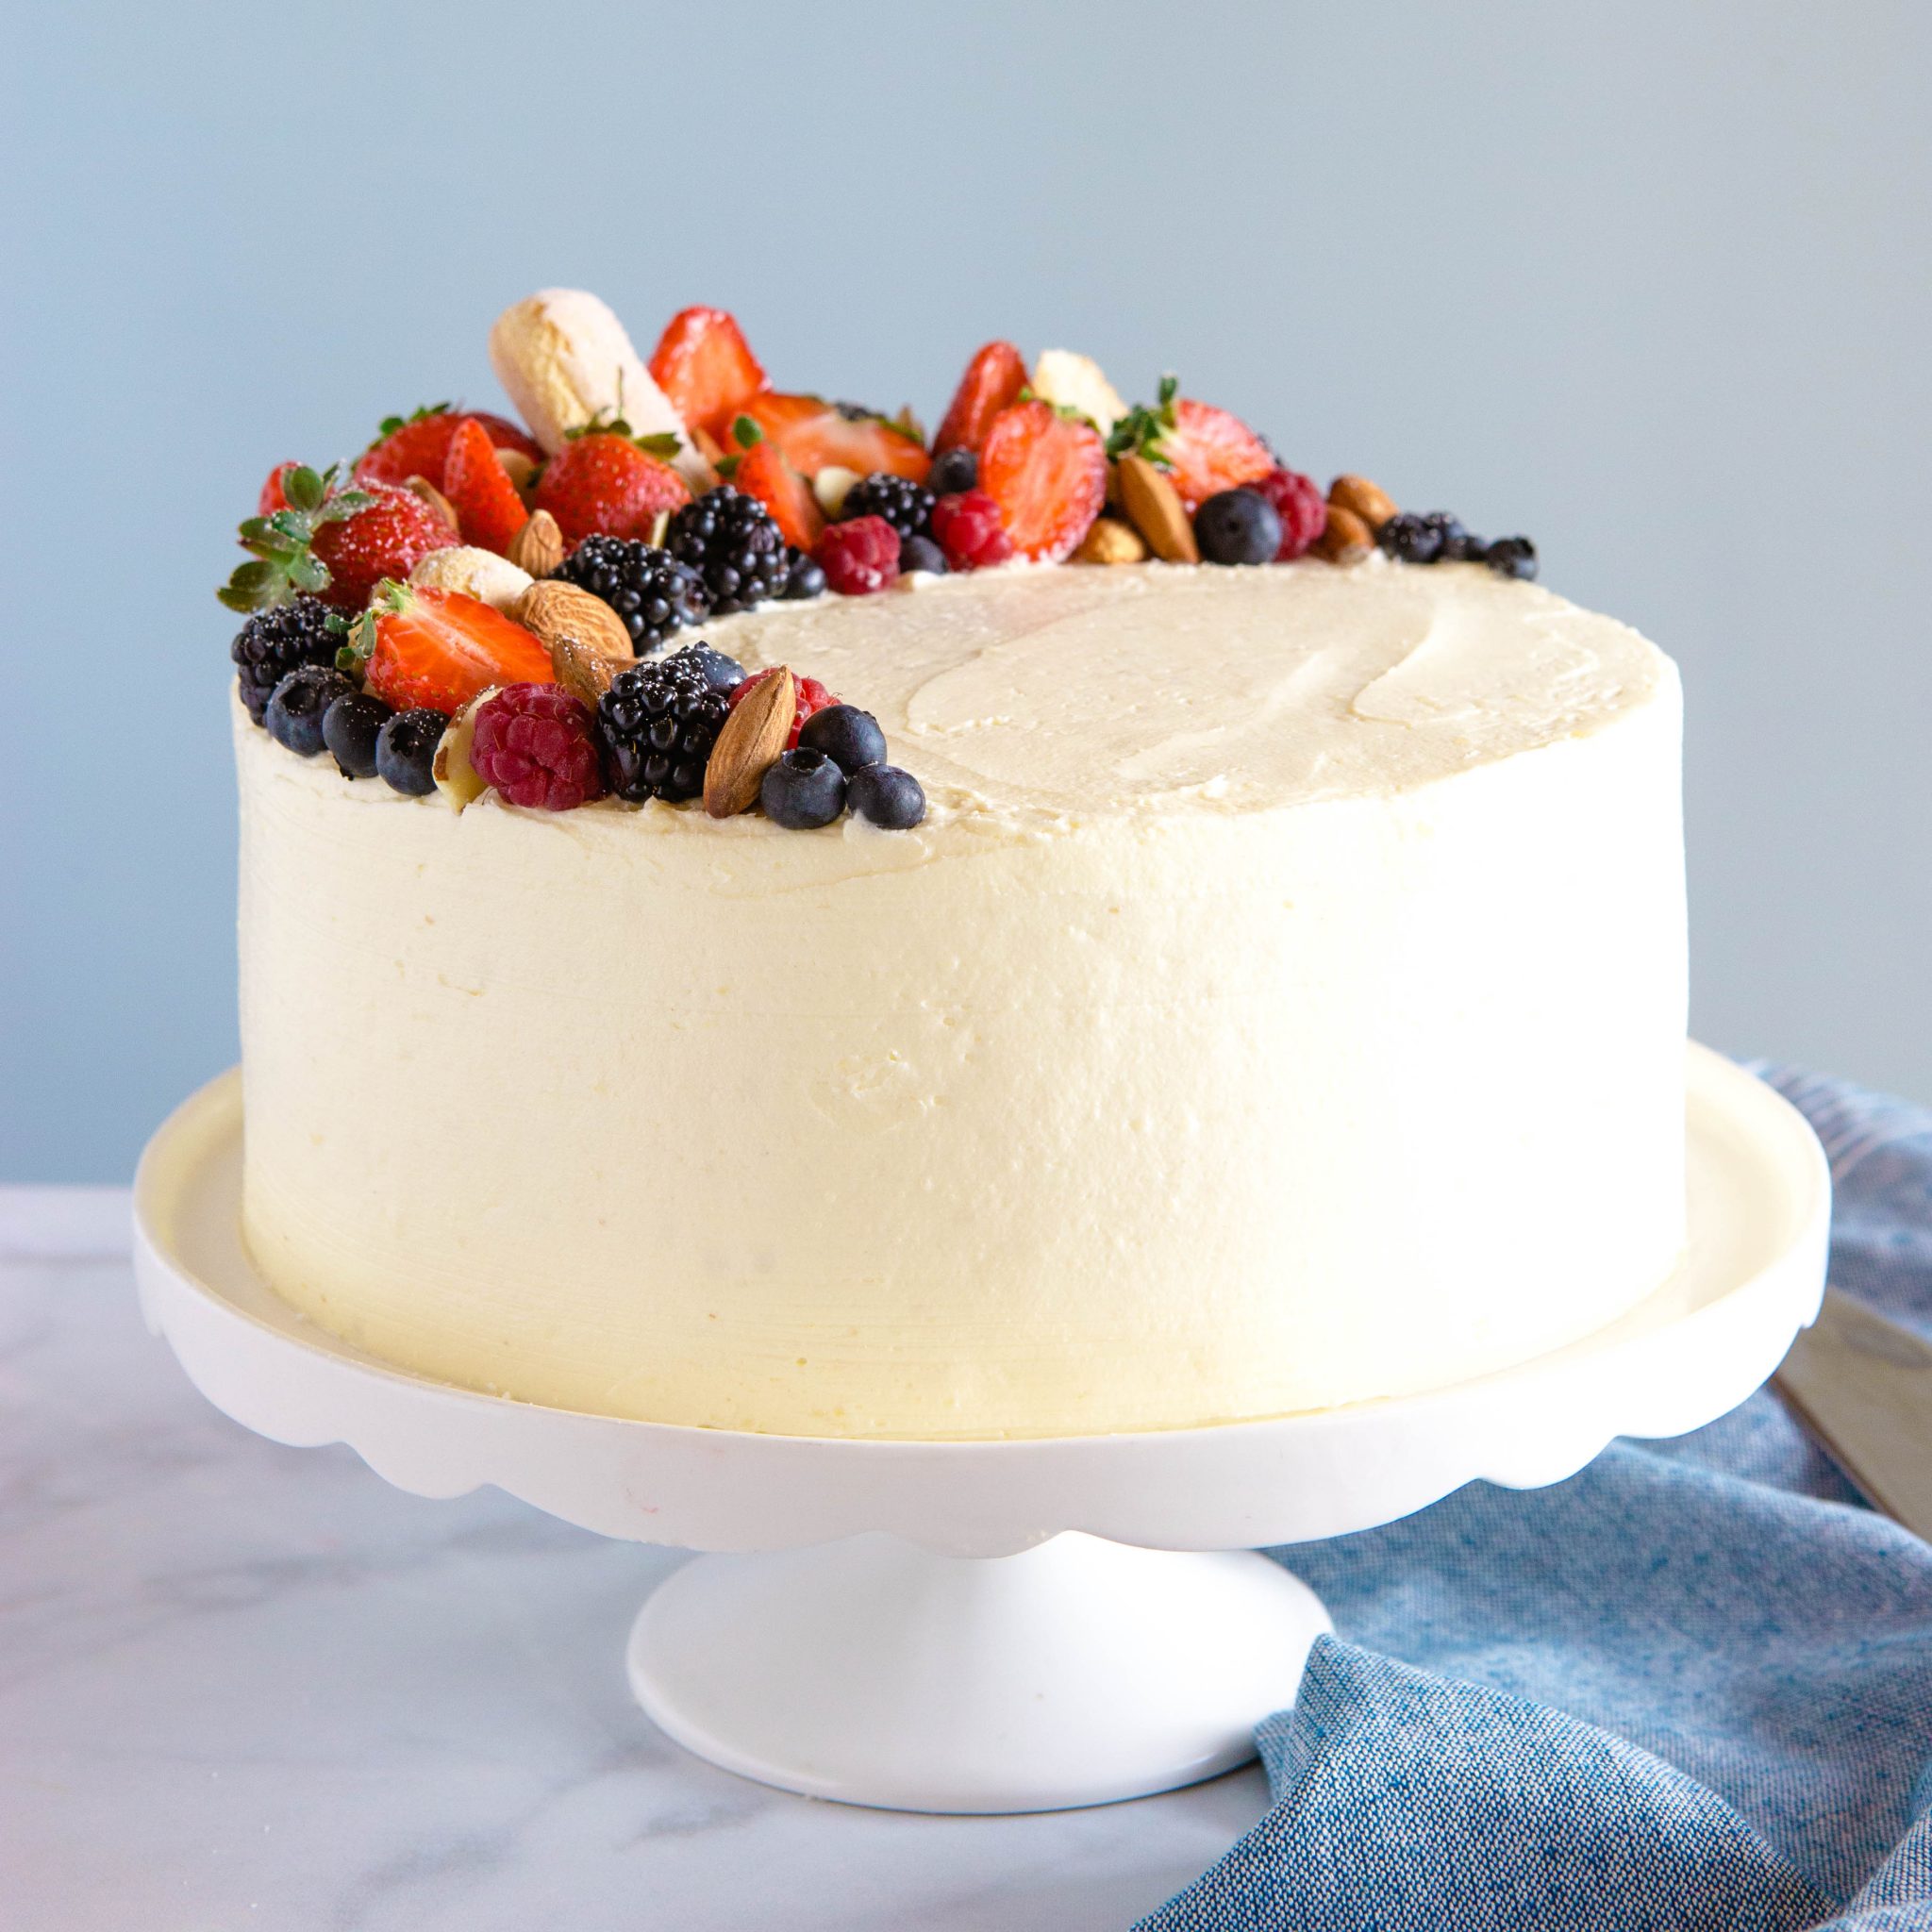
This Best Ever Almond Cream Cake is the perfect cake recipe for birthdays, holidays, or any celebration! A deliciously moist cake with the fluffiest and creamiest almond frosting you’ll ever taste!

NEVER MISS A POST! FOLLOW ME ON:
FACEBOOK | PINTEREST | INSTAGRAM | TWITTER
 **Based on reader feedback, I’m re-sharing this recipe today with several updates to the recipe that make this recipe even better!** It’s not every day a gorgeous layer cake graces my kitchen with its presence – I enjoy baking cakes, of course, but as you all probably know by now I’m certainly no pro when it comes to layer cakes. I like my layer cakes easy, rustic, and simple…nothing like you see in bakery windows. But this Best Ever Almond Cream Cake? It just had to be shared because not only is it beautiful and elegant, it’s also MUCH easier to make than it looks!!

How to make extra creamy buttercream frosting
The frosting on this cake is absolutely divine and it contains a secret ingredient you probably won’t believe ever made it into a frosting recipe. But I’m telling you, this frosting is probably the best frosting I’ve ever, ever had. I’ve been making it for years after I discovered a copycat recipe in the local newspaper for a locally-famous bakery’s classic birthday cake. Their frosting was just plain vanilla, but flavouring it with almond takes it to another level!!

How to garnish a layer cake
When it comes to layer cakes the garnish should always reflect the flavour inside and be something you’d typically serve with that particular cake flavour. For this Best Ever Almond Cream Cake, we chose fresh berries, a few ladyfinger cookies for added texture, and some whole and sliced almonds. And if you’re wondering how we achieved the straight, smooth sides, check out this great tutorial on how you can do it at home with minimal equipment.
EASY NO-FAIL HOLIDAY RECIPES AND COOKING & BAKING TIPS
Get my easy no-fail holiday meals e-cookbook!
 And if achieving straight edges snd arranging fruit until it’s “just so” isn’t your thing (it isn’t really my thing either…), then simply slather this ultra creamy frosting on however you like and in whatever rustic pattern you can come up with. Scatter a few berries and some sliced almonds on top and call it an oh so delicious day!

NEVER MISS A POST! FOLLOW ME ON:
FACEBOOK | PINTEREST | INSTAGRAM | TWITTER
 I hope you love this Best Ever Almond Cream Cake as much as we do! Let me know in the comments below, what’s your favourite layer cake to make for special occasions? I’d love to know!
KITCHEN PRODUCTS I RECOMMEND:
Looking for more easy no bake desserts? You’ll LOVE these:
-
Easy No Bake Peanut Butter Chocolate Cheesecake
-
Easy No Bake Chocolate Peanut Butter Cheesecake Pie
-
Easy No Bake Strawberry Swirl Cheesecake
-
Easy No Bake Orange Creamsicle Cheesecake
-
Easy No Bake Chocolate Mousse Vegan Cheesecake
-
Easy No Bake Strawberry Cheesecake
-
Easy No Bake Classic Tiramisu
-
Easy No Bake Chocolate Mocha Tiramisu
The Done-For-You SUMMER BUNDLE + BONUS Menu Guide!
5 complete recipe guides for effortless summer hosting. The invisible work of summer? Done for you.
If you made this, share a photo!
Are you trying this recipe? Use the comment form below to share your take; now with support for image uploads and comment voting!
Best Ever Almond Cream Cake
Recipe: Ingredients
For the cake:
- 1-2 tablespoons each, butter and flour for greasing and flouring the cake tins
- 1 cup unsalted butter at room temperature
- 2 cups granulated sugar
- 3 medium eggs at room temperature
- 3 medium egg yolks at room temperature
- 3 tablespoons vegetable oil
- 1 teaspoon almond extract
- 1 1/4 cup buttermilk at room temperature
- 3 1/4 cups all purpose flour
- 1 tablespoon baking powder
- 1 1/2 teaspoons baking soda
- 1/2 teaspoon salt
For the frosting:
- 5/8 cup all purpose flour sifted to remove all lumps (1/2 cup + 2 tbsp)
- 2 cups milk
- 2 cups unsalted butter softened to room temperature
- 2 cups powdered sugar sifted to remove all lumps
- a few drops of almond extract
- a pinch of salt
For the decorations:
- 1 cup assorted berries or sliced fruit (strawberries, blueberries, blackberries, raspberries, cherries, peaches, etc.)
- 2-3 plain cookies, shortbread cookies, or lady fingers
- whole and sliced almonds
Recipe: Instructions
For the cake:
- Preheat your oven to 325 degrees Fahrenheit and grease and flour two 9-inch round cake pans (with high sides) or three 8-inch round cake pans (with high sides), lining the bottoms with parchment paper rounds for easy release.
- In the bowl of your stand mixer (or in a large bowl using a hand mixer) whip the butter on medium high speed until very smooth. Add the sugar and mix on high speed until fluffy and creamy. The sugar will start to dissolve into the butter a little bit during this creaming process, so you should be able to feel the grains of sugar getting smaller.
- Add the eggs and egg yolks one at a time, mixing well after each addition. Scrape down the sides of the bowl regularly at this stage to make sure everything is mixed well.
- Mix in the oil and almond extract on low speed.
- Measure the buttermilk into a liquid measuring cup and and set aside.
- Measure and sift the flour, baking powder, baking soda and salt into a separate bowl and combine with a wire whisk.
- Add the dry ingredients and the buttermilk alternatively while the mixer is running on low speed. Add 1/3 of the dry ingredients, half the buttermilk, another 1/3 of the dry ingredients, the other half of the milk, and the remaining dry ingredients.
- Turn the speed of the mixer to medium-low and mix until the batter is smooth (about one minute).
- Pour the batter into the prepared cake pans and bake at 325 degrees Fahrenheit for about 29-34 minutes, or until a toothpick inserted into the middle of one of the cakes comes out clean.
- Cool the cakes in the pans for about 5-7 minutes and then turn them out onto cooling racks to cool completely.
- Once the cakes are cool, store them wrapped in plastic wrap in the fridge until ready to frost. They should be refrigerated for at least 1 hour before frosting.
For the frosting:
- While the cakes cool, heat the milk in a small saucepan on the stove over medium-low heat. Add the flour slowly, whisking constantly to combine.
- Continue to cook this mixture, whisking constantly, until the mixture thickens and no lumps remain.
- Spread out the thickened milk and flour mixture onto a dinner plate to cool completely.
- When the mixture is cool, press it through a sieve or strainer to remove any tiny lumps that may remain.
- Add it to a large bowl with a hand mixer, or to the bowl of your stand mixer, and mix on medium-high speed until smooth.
- Add the butter and mix on medium-high speed until the mixture is very smooth.
- Add the powdered sugar about 1/2 cup at a time, along with the salt and the almond extract.
- Continue to mix on medium-high until the frosting is extra smooth and creamy.
Assembly and decorating:
- Level the top of the cakes with a serrated bread knife or a cake leveler (if you have one). Place one of the cakes on a plate or cake stand and place a dollop of frosting on top.
- Spread out the frosting to the edges of the cake, place the next layer on top and then frost the top and sides of the cake until everything is smooth.
- Use Life Love and Sugar's tutorial on how to get straight edges when frosting layer cakes with buttercream (find the tutorial HERE), or simply frost it in a rustic pattern as you wish.
- Arrange the fruit pieces, cookies, and almonds on top as you wish.
- Refrigerate until ready to serve.
Recipe: Notes
Recipe: Nutrition
Notice: Nutrition is auto-calculated, using Spoonacular, for your convenience. Where relevant, we recommend using your own nutrition calculations.
Is that correct for the frosting? 2 cups of butter?
Yes! The recipe makes quite a lot of frosting so you can frost the entire cake.
This cake is so delicious! This is the 3rd time I’ve made it and the 2nd time my sister requested it for her birthday. The frosting is by far the most delicious frosting. I did have some issues with the frosting this time around but I think it was user error seeing as I had made the flour and milk mixture but wasn’t able to finish the frosting that day and didn’t let it come to room temperature before preceding in making the frosting but I was able to figure it out and get it to where it needed to be lol.
Lori, you did a beautiful job! Thank you for sharing. We love that your sister enjoys this cake, too – happy belated birthday to her.
can the frosting be veganized with earth balance butter and almond milk??
We’ve never tried those replacements ourselves but it should work as long as the earth balance butter behaves like regular butter. If you do try, please let us know!
Mother-in-law stated her favorite cake was “porcupine cake” for her 97th birthday. After researching I decided to make this as almonds are prevalent in porcupine cake.I couldn’t find a porcupine cake locally.
Frosting is absolutely delicious !!Went with rustic as I am an amateur.
That looks yummy! Thank you for taking your time to leave your feedback.
Loved it!
We’re so happy to hear that! Your cake looks AMAZING! Thank you for taking the time to leave your feedback.
Hello, can i make the frosting with different flavours? Like strawberry? If yes, will you pls tell me if to add strawberry essence and when, or fresh strawberries or maybe jam?
Your help is appreciated 😊
You can just replace the few drops of almond extract in the frosting with a few drops of strawberry essence (taste and add more if necessary). I wouldn’t use fresh strawberries or jam in the frosting, however you can try spreading a thin layer of jam on top of the cake layers before you add the frosting and stack them. Hope this helps ☺️
Hello,
Is it possible to freeze this cake? I would love to have it for Thanksgiving…
Thank you
Yes, you can freeze this cake, but make sure you defrost it in the fridge. Happy Thanksgiving to you and your family!
Hi, I’m looking at making a 12 inch 3x layer cake. Do you have any suggestions regarding the ingredient quantities?
12×12 inch square pan?
HI,
Is the flour and milk for the frosting supposed to be really thick? I used 125g of flour is that right?
It is supposed to be thick but you only need 80 grams of flour and 480 ml of milk.